Happy Holidays everyone. We're overdue for an update.
It has been a furious, non-stop hard push to see if we can get this machine operational by New Year's Eve. Not the end of the world if it's not, but it's been fun trying.
Where to start, indeed!
First off, let's discuss Bride's Head. As many of you know, CPR's BoP reproductions are excellent, but the faces of the head, while beautiful, have some issues.
The original head had some different hardware. The guides on the front were screwed in, and beneath the mouth and eye holes there was metal hardware designed to keep the balls from dropping into the head box:
 IMG_5430 (resized).JPG
In that photo, you see the hardware behind the eye holes. Also, the original faceplate holes were beveled. On the new faces, the holes are slightly larger and are not beveled. Also, there is no penetrations with which to mount the old hardware (if you have it).
If you did decide to mount the old hardware somehow, because the holes are bigger, I've read complaints about the eyes looking cross-eyed or wabbling, which could cause problems with the ejectors or rollover switches.
To this set of problems I set my son on a mission to fix, and we were successful!
For starters, we traced the original hardware and measured everything with a caliper.
IMG_5431 (resized).JPG
My son then entered the measurements into his design software for the 3D printer and created some prototypes. The general idea was to create a new, lighter weight but durable mounting hardware with individual 1" holes for both the eyes and mouth. We experimented with different thickenesses (adding a couple mm mades the ABS twice as strong, but we wanted to make sure it was similar to the original hardware). Once we were happy with the shape and orientation, made final versions and added some super strong 3M two sided tape. This is the same tape we used to mount the outer cabinet rails.
IMG_5472 (resized).JPG
The key to placing the tape is making sure you can't see it, since we wanted the black to show through the hole properly.
IMG_5473 (resized).JPG
Here's what it looks like from inside:
IMG_5479 (resized).JPG
More importantly, it catches the ball perfectly and looks great. Plus, we didn't need to drill any additional holes in the face plate, which is a great bonus (fewer screws in the front). Here's how it looks from outside:
IMG_5449 (resized).JPG
We thought about printing it in white, but honestly we like the look of the black better. Problem solved!
Next, each assembly was disassembled, tumbled, and reassembled. The coils were desoldered, cleaned and re-papered. We chose to print the coil wrappers ourselves onto brightly colored paper. I think the look turned out pretty good. Here are the three coils from the head assembly:
IMG_5469 (resized).JPG
Included in all of this was a complete flipper rebuild. Thanks to  vid1900 for the instructions. I started by reversing the order of the photos I took taking them apart, but quickly after reading vid1900 's guide, I realized they were completely built wrong when we got the machine. Now we've upgraded the System 11 flippers to more of the WPC feel. Let me know if you see anything wrong, though, this is our first time even adjusting flippers let alone rebuilding them. We're about 80% sure the wiring is right, you'll notice we left out soldering one lead so we can do it while we solder it into the harness later.
IMG_5499 (resized).JPG
We decided to replace all the switches on the switch harness, as they were in various states ranging from sometimes functional to clearly having been immersed in beer. This was our first go at this, but we managed to get through it all.
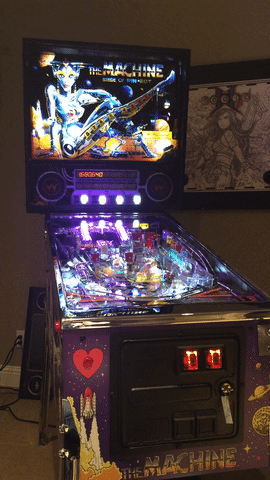
Tonight was a pretty big moment of truth, we installed the switch harness onto the playfield. Despite all your careful advice about photos, mine must have absolutely sucked, because I could barely figure out from them where to put everything. Fortunately it worked itself out. With the switch harness installed, we connected the umbilical to the MPU and tested the switches. I was terrified we'd turn on the machine and the diodes would be backwards or something, but fortunately all was good (except for a few switches that I needed to swap around). Here's the current state:
IMG_5497 (resized).JPG
Since we haven't installed the ramps, pop bumpers or upper playfield and wireform rails yet, we couldn't test all the switches, but so far aso good. Any opinions on what our next step should be? We're thinking install the assemblies on the underside, then the other two harnesses, before adding the additional levels on the playfield above. Thoughts?
 Saint Paul, MN

