(Topic ID: 172139)

Bally Strikes and Spares - Not just for hot redheads Club

By awarner

7 years ago


Topic Heartbeat

Topic Stats

  • 132 posts
  • 49 Pinsiders participating
  • Latest reply 83 days ago by Niall
  • Topic is favorited by 30 Pinsiders

You

Linked Games

Topic Gallery

View topic image gallery

IMG_8406 (resized).jpeg
IMG_8402 (resized).jpeg
IMG_8405 (resized).jpeg
IMG_20230609_170619 (resized).jpg
IMG_20230609_225340 (resized).jpg
345861227_206082685571366_3946263589398622841_n (resized).jpg
IMG_0615 (resized).JPG
IMG_0614 (resized).JPG
IMG_0610 (resized).JPG
IMG_0609 (resized).jpg
20230422_213522 (resized).jpg
20230422_213440 (resized).jpg
IMG_0559 (resized).JPG
IMG_20220617_115548 (resized).jpg
IMG_20220708_135526 (resized).jpg
IMG_20220617_115536 (resized).jpg
There are 132 posts in this topic. You are on page 2 of 3.
#51 7 years ago

Just found a Strikes and Spares project, after looking for years. Drove 6hrs each way, but am happy with what I got. Cabinet has some scrapes and chips, but not faded and no way I'd repaint it. Backglass near perfect. Doesn't work, and MPU has significant corrosion. Playfield is restorable, but worn. I have an NOS PF that I will level the inserts and clear with 2pac. Got the CPR plastics set.

Plan is to repin connectors, rebuild rectifier board, caps on solenoid driver board, etc and get it working dirty. I'll then think about the playfield swap n

image (resized).jpgimage (resized).jpg

1 month later
#52 6 years ago

I would like to join!

I picked up Playboy and Strikes and Spares not working a couple of weeks ago. I have been working on them a little everyday. Here's my progress.

DSC_0141 (resized).JPGDSC_0141 (resized).JPG

DSC_0140 (resized).JPGDSC_0140 (resized).JPG

1 month later
#53 6 years ago

I've joined the club! Been working on this for a couple of months now and am finishing it up.
Dialing in now and the only problem I have is that when the saucer ejects the ball it goes SDTM every time! Any suggestions on how to resolve this? Playfield is leveled and slope is at 5.6 degrees. Started at 6.1 degrees and it goes SDTM every time.
Any suggestions?

IMG_8193 (resized).JPGIMG_8193 (resized).JPG

IMG_8262 (resized).JPGIMG_8262 (resized).JPG

IMG_8263 (resized).JPGIMG_8263 (resized).JPG

1 week later
#54 6 years ago

xsvtoys invited me to the Strikes and Spares pages from my price check posting. A S and S popped up on my local Craigs List and the price seemed to be right so I bought it with the thought that I may be able to clean it up and sell and make a little money; I did not buy it as a keeper. I don't have room to set it up until I get another pin back together. I'll know more when I can get it up and playing. Who knows. Maybe I'll try to squeeze more space and keep it.

Anyway, here is a pic of the play field. It just needs some light touch up around a couple of inserts and a good cleaning and it is not all that dirty. I'm toying with the idea of clear coating it since I have some extra automotive clear coat.

The cab is nice an very solid. Not beat up, at all. The back glass is flaked; A repro is needed. Everything worked when I bought it. I just to make some of the parts to work better.

IMG_4145 (resized).JPGIMG_4145 (resized).JPG

My favorite pinball plastic: "Back up a little bit, will ya? "

It is just a piece of plastic. Right out in the open. A common view if you are hanging out at the bowling alley. But on this piece of plastic, it is suggestive---but it is not. Is is pure sex---but it is not. A brilliant piece of artwork.

IMG_4193 (resized).JPGIMG_4193 (resized).JPG

1 month later
#55 6 years ago

I recently bought a S and S as part of a package. I don't have enough room in my house to keep it but I just got it set up and running and I'm wishing that I could keep it.

It is quite fun to play. It has everything I like in a pinball machine: Fast play and lots of good flipper friendly shots; But there are no easy points.

#56 6 years ago

Love this game. On my want list. I have seen the alternate backglass for this. The girl is topless. Very nice. A vendor had one at PATZ a few years ago.

#57 6 years ago

I had one of these 3 years ago and sold it to fund a dmd machine purchase. I've regretted it ever since. Fast forward to now and I was tagged on Facebook by a fellow pinhead who knew that I was searching for one. I got in contact with the seller and he just happened to have the S and S in the bed of his truck and was passing through on his way home. I checked it out and decided to take it. Backglass is mint , playfield will be an easy resto rest and 2k clear job, the rest needs work. The MPU is toast and the rectifier has a bit of corrosion, the remaining boards are clean. The previous owner cut all of the connectors to the rectifier and direct soldered them, then to detach the head used twist connectors. What a mess. Whole machine needs repinned obviously. My plan board wise is to do the Alltek Trifecta setup and ditch the factory ones.

20170825_085647 (resized).jpg20170825_085647 (resized).jpg

20170825_085623 (resized).jpg20170825_085623 (resized).jpg

20170825_141731 (resized).jpg20170825_141731 (resized).jpg

20170826_192625 (resized).jpg20170826_192625 (resized).jpg

20170826_192611 (resized).jpg20170826_192611 (resized).jpg

#58 6 years ago

That game looks good except for the electronics. I thought my soldering needed improvement, but damn! Good luck w/the game.

1 week later
#59 6 years ago

Just finished up my first cabinet restore. Pinball Pimp stencils are great to work with.

IMG_2416 (resized).JPGIMG_2416 (resized).JPG

IMG_2417 (resized).JPGIMG_2417 (resized).JPG

IMG_2418 (resized).JPGIMG_2418 (resized).JPG

IMG_2421 (resized).JPGIMG_2421 (resized).JPG

IMG_2422 (resized).JPGIMG_2422 (resized).JPG

IMG_2423 (resized).JPGIMG_2423 (resized).JPG

IMG_2425 (resized).JPGIMG_2425 (resized).JPG

IMG_2426 (resized).JPGIMG_2426 (resized).JPG

IMG_2427 (resized).JPGIMG_2427 (resized).JPG

IMG_2429 (resized).JPGIMG_2429 (resized).JPG

IMG_2430 (resized).JPGIMG_2430 (resized).JPG

#60 6 years ago

IMG_2419 (resized).JPGIMG_2419 (resized).JPG

IMG_2490 (resized).JPGIMG_2490 (resized).JPG

IMG_2491 (resized).JPGIMG_2491 (resized).JPG

IMG_2492 (resized).JPGIMG_2492 (resized).JPG

IMG_2493 (resized).JPGIMG_2493 (resized).JPG

IMG_2495 (resized).JPGIMG_2495 (resized).JPG

IMG_2494 (resized).JPGIMG_2494 (resized).JPG

IMG_2499 (resized).JPGIMG_2499 (resized).JPG

IMG_2500 (resized).JPGIMG_2500 (resized).JPG

#61 6 years ago

IMG_2501 (resized).JPGIMG_2501 (resized).JPG

IMG_2502 (resized).JPGIMG_2502 (resized).JPG

IMG_2505 (resized).JPGIMG_2505 (resized).JPG

IMG_2506 (resized).JPGIMG_2506 (resized).JPG

IMG_2507 (resized).JPGIMG_2507 (resized).JPG

#62 6 years ago

Dang that is SWEET!!!!! With a new backglass and a new playfield mine would be just about perfect if I did the cabinet, I hope to do it some day. You laid it out step by step, it looks doable. (I've never done one before though). Can you ID the paint colors, I can't see them from the pic showing the cans of paint. Does the Pimp tell you exactly what paints to buy?

#63 6 years ago

Mine should get started later this year (I hope). I have the stencils as well. You did an amazing job! Thanks for sharing and motivating us!

#64 6 years ago

Anyone else here prefer chrome legs over the gunmetal factory color? I am contemplating completely chroming out all of the trim and door on my machine. I think it will look amazing

#65 6 years ago
Quoted from sohchx:

Anyone else here prefer chrome legs over the gunmetal factory color? I am contemplating completely chroming out all of the trim and door on my machine. I think it will look amazing

Here's my thoughts. First, it's your game. You can do anything you want to make it look better or whatever. People might criticize you for it, but it's still your game. Now saying that, people need to decide whether they are restoring a game or re-inventing a game.

If you are restoring the game then everything you just said is out. No, you can't do it. And no LEDs either. I just restored a Police Force and took 1st place in restorations at the Atlanta SFGE. It plays like it's 1988 and it just rolled out of the box.

Now the Re-Inventing category. Times have changes since these games were made. Nobody in 1977 would ever see the need to chrome parts that weren't chrome already. Actually, the cost makes it make no sense even today. BUT, it's your game and if you don't care that you might be wasting money to build a game that costs more than it's worth simply because it will look awesome than I think you should go for it. My BOP 2.0 easily has $6K in it with chrome, new art, and MODs. Maybe more. I don't know if I could get it back out but I don't really care because I didn't build it for a profit, I built it to be freaking awesome. It's just like cars really.

2 months later
#66 6 years ago

Does anyone that has done a full resto on one of these by chance have access to a source for obtaining all of the papers that are stapled inside of the backbox?? Mine are all yellowed.

#67 6 years ago
Quoted from sohchx:

Does anyone that has done a full resto on one of these by chance have access to a source for obtaining all of the papers that are stapled inside of the backbox?? Mine are all yellowed.

Backbox cards @ http://www.pinballrebel.com/pinball/cards/

#68 6 years ago

Regarding the saucer kicking the ball down the middle, try a more forgiving angle on the playfield. Mine did the same thing, until I made it less steep.

#69 6 years ago

Thanks a ton much appreciated !!! I had forgotten all about this site

1 month later
#70 6 years ago

Been going steady with this redhead since high school. Used to play it every afternoon after school at the Village Bowling Alley in Cleveland, TN. My wife and I rescued one from a lake house that had collapsed. The pin was in a foot of water and missing the legs. Total train wreck. But my wife restored it over the period of about a year. Now it looks and plays great.

We've put in warm white LED's, new boards, legs, power supply, etc. We decided not to restore the cabinet, but only to clean it up. We like the battle scars-including lots of coin-operator stickers from Texas circa 1979-1983. Reminds me of my misspent youth.

And it's a fast, fun game--one of the best from the solid state era.

Les & Abby Rayburn
Maylene, AL

2 months later
#71 6 years ago

I sold my game a few years ago and I’m starting a new one. It should be amazing when it’s done.
EACA059E-6D68-408D-BB7A-8F3E3BEB22F3 (resized).jpegEACA059E-6D68-408D-BB7A-8F3E3BEB22F3 (resized).jpegA1D95E2E-F7A0-4299-AED7-CB700CC04021 (resized).jpegA1D95E2E-F7A0-4299-AED7-CB700CC04021 (resized).jpeg

48A80FA4-85AC-43CC-AA9F-12EE73C17E1C (resized).jpeg48A80FA4-85AC-43CC-AA9F-12EE73C17E1C (resized).jpeg

2 weeks later
#72 5 years ago

Driving home with a project S & S.
Missing backglass & Boards but Playfield and cabinet is in okay shape and I didn't give much for it. Any suggestions on where to find a backglass and boards?

#73 5 years ago
Quoted from Heaterguy:

Driving home with a project S & S.
Missing backglass & Boards but Playfield and cabinet is in okay shape and I didn't give much for it. Any suggestions on where to find a backglass and boards?

BG Resto

http://bgresto.com/

Scroll down. It is on file.

#74 5 years ago

Thanks, unfortunately I may scrap it for parts, I could fix it but Its missing more parts than it will be worth, unless I can find used parts.
Paid $125- PF "decent" condition, plastics filthy but not cracked. Jet bumper caps have burnt spots. Coin door legs dirty but good condition. Cabinet Fair condition. Displays intact, 1 has been replaced. Wiring harness hacked.

MISSING:
Backglass-$230
Transformer $100
MPU board $200
Lamp board $120
Solenoid board $150
Rectifier board $100
Rubber kit/Jet caps/new Mylars/Misc-$75
Multiple shipping charges $75
Displays????? (Prolly need replaced)

All in, best case, With original PF...

$1,175

And that is $0 FOR ALL MY LABOR, and no $ for displays.

I hate it but I may have to part this one out.

One thing that is cool, there is a date scratched in the head that says Wheaton 4/23/79. I purchased the machine not far from Chicago and it was built there so it probably has not left the region in its entire lifetime.

20180501_220133 (resized).jpg20180501_220133 (resized).jpg

20180501_214130 (resized).jpg20180501_214130 (resized).jpg

20180501_213520 (resized).jpg20180501_213520 (resized).jpg

1 month later
#75 5 years ago

I’ve been working on my playfield swap.

EEA625D2-CBEB-40BD-9EE0-0F496650F029 (resized).jpegEEA625D2-CBEB-40BD-9EE0-0F496650F029 (resized).jpeg08D75565-D882-470B-9A69-627E4F0C7712 (resized).jpeg08D75565-D882-470B-9A69-627E4F0C7712 (resized).jpeg4CA5A3ED-9D44-4EE3-9A3B-EF99777D02C2 (resized).jpeg4CA5A3ED-9D44-4EE3-9A3B-EF99777D02C2 (resized).jpeg

1 week later
#76 5 years ago

Pwr supply/fuse board showed up today! Previously bought selenoid and lamp board off eBay . Only one more piece to the puzzle... mpu board. I can't remember now but I researched it and had a couple options which one should I get?
Also, the boards that I bought on eBay do not have steel or alum posts where the screws bolt them down on opposite corners of lamp board and Driver board. I am not sure, do I need to have spacers because the plastic insert circuit board holders hold them off of the Rails so I would think I need spacers behind the circuit board on the screws. Any suggestions as to where to find something like this? Ace Hardware?
1528497651548587432412 (resized).jpg1528497651548587432412 (resized).jpg20180608_183403 (resized).jpg20180608_183403 (resized).jpg

20180608_184911 (resized).jpg20180608_184911 (resized).jpg
4 months later
#77 5 years ago

I’ve had this girl for 2 years and finally took her to the surgeon..
Now she’s back and I’m thrilled with the enhancements !

131ADD47-7A77-48C3-BBDB-441542FBA9C8 (resized).jpeg131ADD47-7A77-48C3-BBDB-441542FBA9C8 (resized).jpeg219ACA9E-A543-49ED-866F-1F2A66E18A98 (resized).jpeg219ACA9E-A543-49ED-866F-1F2A66E18A98 (resized).jpeg720C1AAF-91F0-4E05-BBBC-EC7BBFBF8153 (resized).jpeg720C1AAF-91F0-4E05-BBBC-EC7BBFBF8153 (resized).jpegF5BB805D-2D6D-4A83-9AD6-FD16495B397A (resized).jpegF5BB805D-2D6D-4A83-9AD6-FD16495B397A (resized).jpeg
1 month later
#78 5 years ago

Finally getting round to my next project, S&S...
Purchased about a year ago with no circuit boards except for displays however it had a populated Playfield (that was rough but repairable) cabinet, head with some janky displays, and also missing the back glass.
In a year's time I have collected all the missing parts including a very nice back glass.
I am just getting around to putting it back together and have some questions;
There are wires that have been cut (from displays to playfield...see pics) There are loose wires from the playfield harness that appear to match the cut wires in the backbox.
It appears that the head would not be removable without clipping the wires that have been clipped. Is that the case with this game because it would make it difficult to move...

20181202_181508 (resized).jpg20181202_181508 (resized).jpg20181202_201004 (resized).jpg20181202_201004 (resized).jpg20181202_201020 (resized).jpg20181202_201020 (resized).jpg20181202_201114 (resized).jpg20181202_201114 (resized).jpg20181202_201131 (resized).jpg20181202_201131 (resized).jpg20181202_201146 (resized).jpg20181202_201146 (resized).jpg20181202_201353 (resized).jpg20181202_201353 (resized).jpg

#79 5 years ago

My memory might be hazy on this, but I am pretty sure when I bought mine in I took the head off, moved it, and got it back together without having to cut any wires. Everything unplugged and plugged back in no problem.

#80 5 years ago
Quoted from xsvtoys:

My memory might be hazy on this, but I am pretty sure when I bought mine in I took the head off, moved it, and got it back together without having to cut any wires. Everything unplugged and plugged back in no problem.

Your memory is correct. The head can be removed without cutting wires.

#81 5 years ago

One would hope so lol Thanks guys, Im just getting started, thought it was odd someone cut the harness for no reason.

#82 5 years ago

Can anyone here help me out with this? I bought molex kits to redo every connector in the back box but want to verify where each wire goes before assembly.

20170826_192611 (resized).jpg20170826_192611 (resized).jpg

#83 5 years ago
Quoted from sohchx:

Can anyone here help me out with this? I bought molex kits to redo every connector in the back box but want to verify where each wire goes before assembly.

The original wire color codes are found at the bottom of the "Plug Connections" page of the schematics.
And tells you what color wire goes to which connector/position on which board.
(pages 38/39 of the manual that is on IPDB)

#84 5 years ago
Quoted from Timerider:

The original wire color codes are found at the bottom of the "Plug Connections" page of the schematics.
And tells you what color wire goes to which connector/position on which board.
(pages 38/39 of the manual that is on IPDB)

Many thanks!! I've looked through both of these manual links on ipdb and don't see them unless I'm just completely missing it??

Screenshot_20181205-165400 (resized).jpgScreenshot_20181205-165400 (resized).jpg
#85 5 years ago
Quoted from sohchx:

Many thanks!! I've looked through both of these manual links on ipdb and don't see them unless I'm just completely missing it??[quoted image]

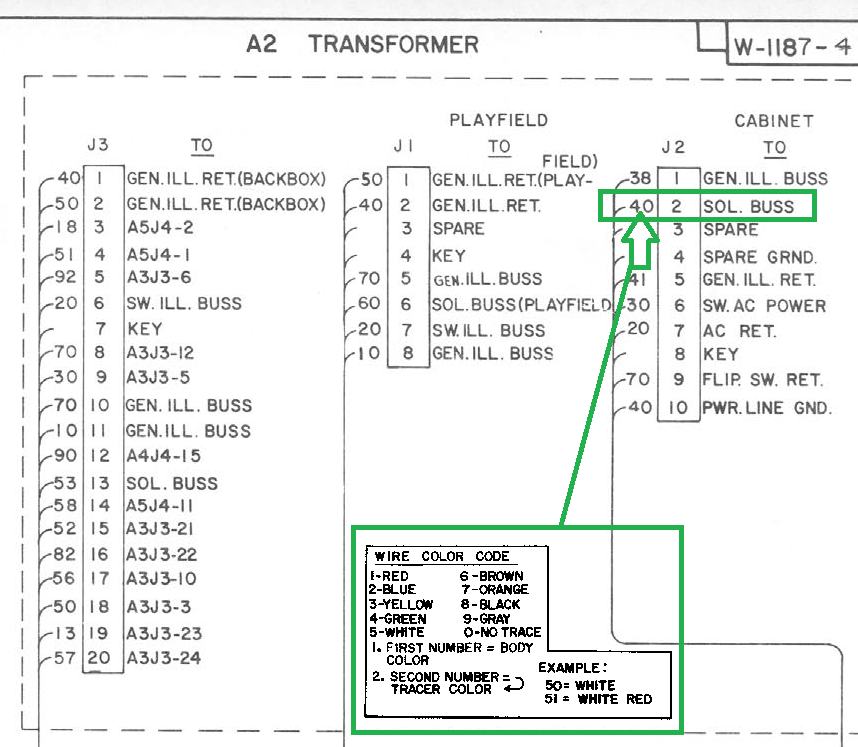
Go back to the schematics and scroll down to pg. 38-39. All of your circuit boards have a blueprint reference number. Your transformer is called A2 (see 1st pic). A2 has three connectors that represent what you are actually touching in your pin. Those connectors are J-1, J-2, and J-3

Screen Shot 2018-12-05 at 4.50.52 PM (resized).pngScreen Shot 2018-12-05 at 4.50.52 PM (resized).png

Down lower is the color code legend. This pic is of the Solenoid driver, also referred to as A-3. Down at bottom of this page you will see "Plug Connectors".

Screen Shot 2018-12-05 at 4.48.54 PM (resized).pngScreen Shot 2018-12-05 at 4.48.54 PM (resized).png

Go to connector address A2-J3-8. That is A2 transformer, connector J-3, pin #8. Next to pin #8 you will see a key plug in pin #7. To the right of A2-J3-8 you will see A3-J3-12. This is the address for Solenoid Driver A3, connector J3, pin 12. To the left of both of these address you will see the number 70.

70 is your color code. The color code table is at the bottom of the above page. #7 = red. #0 = no trace. So, the color of wire at A2-J#-8 is red. and the color of A3-J3-12 is red.
*******************************************************

Look at A2-J3-14. The color code is 58. #5 is white. #8 is black. So, 58 is a white wire with a black trace. And travels from A2 to A3.

Look at A3-J3-25. Color code is 64. #6 is brown. #4 is green. So, the wire is brown with a green trace. This wire travels to A3-J3-13. Again, color code 64. All this BRN-G wire is is a jumper wire that travels from pin #13 to pin #25 on the same connector.

Do yourself a favor. Go to Marco Specialties and get a nicely printed reproduction manual with the schematics.

******************************

A1= the displays wiring in your back box.

A2 = Transformer

A3 = Solenoid driver board (SDU)

A4 = MPU/ CPU

A5 = Lamp Driver board.

#86 5 years ago

Unfortunately they are out of stock.

#87 5 years ago
Quoted from Buzz:

Unfortunately they are out of stock.

Bummer. How about Steve at PBR?

2 weeks later
#88 5 years ago

Does anyone know what the default dipswitch positions are as far as liberal vs conservative settings go? (https://www.ipdb.org/files/2406/Bally_1978_Strikes_and_Spares_Manual.pdf)

#89 5 years ago
Quoted from PhilGreg:

Does anyone know what the default dipswitch positions are as far as liberal vs conservative settings go? (https://www.ipdb.org/files/2406/Bally_1978_Strikes_and_Spares_Manual.pdf)

Default was 3 ball play, liberal settings.

#90 5 years ago
Quoted from MrBally:

Default was 3 ball play, liberal settings.

Oh, 3 balls! I had it set on 5 with liberal settings and I found it way too easy to roll it over.

3 months later
#91 5 years ago

I’m finally getting back to my game restoration after almost a year...

9CD45805-7484-4332-9567-917B8B8CD706 (resized).jpeg9CD45805-7484-4332-9567-917B8B8CD706 (resized).jpeg
#92 5 years ago

hope they release a hardtop for this. I have been trying to restore a playfield but we will see how it turns out hah.

10 months later
#93 4 years ago

Just joined the S & S club! Added a pretty nice restored example. Not perfect, but decent cab re-painted. Playfield was sanded and touched up then clearcoated. So it feels smooth and plays very fast. Really fun game from an underrated era. I had a Black Hole and really enjoyed that pin too. This one is so bright and the chimes and bells are awesome. Great game!

782E3FA0-993E-4499-BBE5-951D6351A73B (resized).jpeg782E3FA0-993E-4499-BBE5-951D6351A73B (resized).jpeg7A92D131-1F8B-451D-8CEF-C9C2D4C2877C (resized).jpeg7A92D131-1F8B-451D-8CEF-C9C2D4C2877C (resized).jpeg64F6F003-BB56-4EBF-9B59-972FC3FDED94 (resized).png64F6F003-BB56-4EBF-9B59-972FC3FDED94 (resized).png1840162C-8A77-44CB-A233-5A398E88B54D (resized).png1840162C-8A77-44CB-A233-5A398E88B54D (resized).png428A3B19-B1BC-431A-AD42-34B57708A73C (resized).jpeg428A3B19-B1BC-431A-AD42-34B57708A73C (resized).jpeg9000F0A9-7F3D-4B75-A661-6949A4C2272E (resized).png9000F0A9-7F3D-4B75-A661-6949A4C2272E (resized).pngF176D108-B570-4CC9-B23D-F2BF6E5B5F38 (resized).pngF176D108-B570-4CC9-B23D-F2BF6E5B5F38 (resized).png51D6DFF5-193A-4754-9827-15A56A91822D (resized).jpeg51D6DFF5-193A-4754-9827-15A56A91822D (resized).jpeg
#94 4 years ago
Quoted from Pinkitten:

Just joined the S & S club! Added a pretty nice restored example. Not perfect, but decent cab re-painted. Playfield was sanded and touched up then clearcoated. So it feels smooth and plays very fast. Really fun game from an underrated era. I had a Black Hole and really enjoyed that pin too. This one is so bright and the chimes and bells are awesome. Great game![quoted image][quoted image][quoted image][quoted image][quoted image][quoted image][quoted image][quoted image]

Lucky you, I'm a bit envious. S&S is a great pin and I've been keeping an eye on a restored one for a while already but nothings popped up on my radar screen. Enjoy the game!

#95 4 years ago

Thanks! I didn’t know much about this game. But I saw an older post by a collector I’ve dealt with before, so I reached out to see if he still had it. It was expensive, but I wanted a really beautiful example because I usually only have one early SS pin. It would be fun to restore one too.

1 month later
#96 4 years ago

Is there a way to set this game to free play?

1 month later
#97 3 years ago

I picked this game up about a month ago, and got it working minus the chimes.

I don’t get any voltage at the chimes or the coindoor lockout relay. I repinned a few connectors so I’m not sure if I got a wire in a wrong spot or not. The chimes don’t work in self test either.

Does anyone have any suggestions?

#98 3 years ago
Quoted from jdoz2:

I don’t get any voltage at the chimes or the coindoor lockout relay. I repinned a few connectors so I’m not sure if I got a wire in a wrong spot or not. The chimes don’t work in self test either.

Does anyone have any suggestions?

Solenoid power to the cabinet (chimes and coin door lockout coil) comes from the J2 connector on the rectifier board specifically the thin green wire at pin 2. Note pin 10 also has a green wire but it's thicker and is a ground wire from the line cord.
Check/replace the pin 2 crimp terminal on that J2 connector.

Strikes&Spares_RectifierBoard_CabinetConnector.gifStrikes&Spares_RectifierBoard_CabinetConnector.gif

#99 3 years ago
Quoted from Quench:

Solenoid power to the cabinet (chimes and coin door lockout coil) comes from the J2 connector on the rectifier board specifically the thin green wire at pin 2. Note pin 10 also has a green wire but it's thicker and is a ground wire from the line cord.
Check/replace the pin 2 crimp terminal on that J2 connector.
[quoted image]

You are awesome! I had my green wires switched. Never noticed the color code chart so that is super helpful in the future.

2 weeks later
#100 3 years ago

Thinking of selling or trading mine. Message me for more details and pictures.

New CPR play field, all new parts and cabinet was completely re-done

20200501_114953 (resized).jpg20200501_114953 (resized).jpg20200501_115030 (resized).jpg20200501_115030 (resized).jpg
Promoted items from Pinside Marketplace and Pinside Shops!
$ 3.00
Playfield - Other
Rocket City Pinball
 
From: $ 10.00
Electronics
Third Coast Pinball
 
From: $ 15.00
Cabinet - Other
NO GOUGE PINBALL™
 
From: $ 170.00
$ 18.95
Eproms
Pinballrom
 
$ 69.00
Gameroom - Decorations
Pinball Pimp
 
$ 149.95
Boards
Allteksystems
 
There are 132 posts in this topic. You are on page 2 of 3.

Reply

Wanna join the discussion? Please sign in to reply to this topic.

Hey there! Welcome to Pinside!

Donate to Pinside

Great to see you're enjoying Pinside! Did you know Pinside is able to run without any 3rd-party banners or ads, thanks to the support from our visitors? Please consider a donation to Pinside and get anext to your username to show for it! Or better yet, subscribe to Pinside+!


This page was printed from https://pinside.com/pinball/forum/topic/bally-strikes-and-spares-not-just-for-hot-redheads-club/page/2?hl=quench and we tried optimising it for printing. Some page elements may have been deliberately hidden.

Scan the QR code on the left to jump to the URL this document was printed from.