 Holt, MI
Wow. It just keeps getting more and more pretty.
(Topic ID: 158117)
 Frontier
Bally, 1980
Frontier
Bally, 1980Quoted from RyanClaytor:Wow. It just keeps getting more and more pretty.
Yes, what he said
Quoted from RyanClaytor:Wow. It just keeps getting more and more pretty.
Thanks everyone for the nice comments! I have had a couple close calls with tools in my hand working on the cabinet. I keep thinking wow I almost dropped this tool or bumped the cabinet with that one. I did open the coin door all the way and noticed that the coin return button hits the cabinet. I need a door stop!
Quoted from Arcane:Superb. Are you going to install a fan between the cabinet and the backbox, to improve air circulation?
Yves
I haven't considered this option. Can you tell me more?
Some people have installed a small computer fan (12 VDC) on the back channel, right between the lower part of the cabinet and the backbox. The fan sucks fresh air coming from below the playfield and provides a stream of fresh air along the backglass and the electronics. The air then evacuates through the louvers located at the top of the backbox.
It is probably useless in your case since you have moved to all LEDs lighting, which does not generate the same amount of heat on the backglass and backbox.
Yves
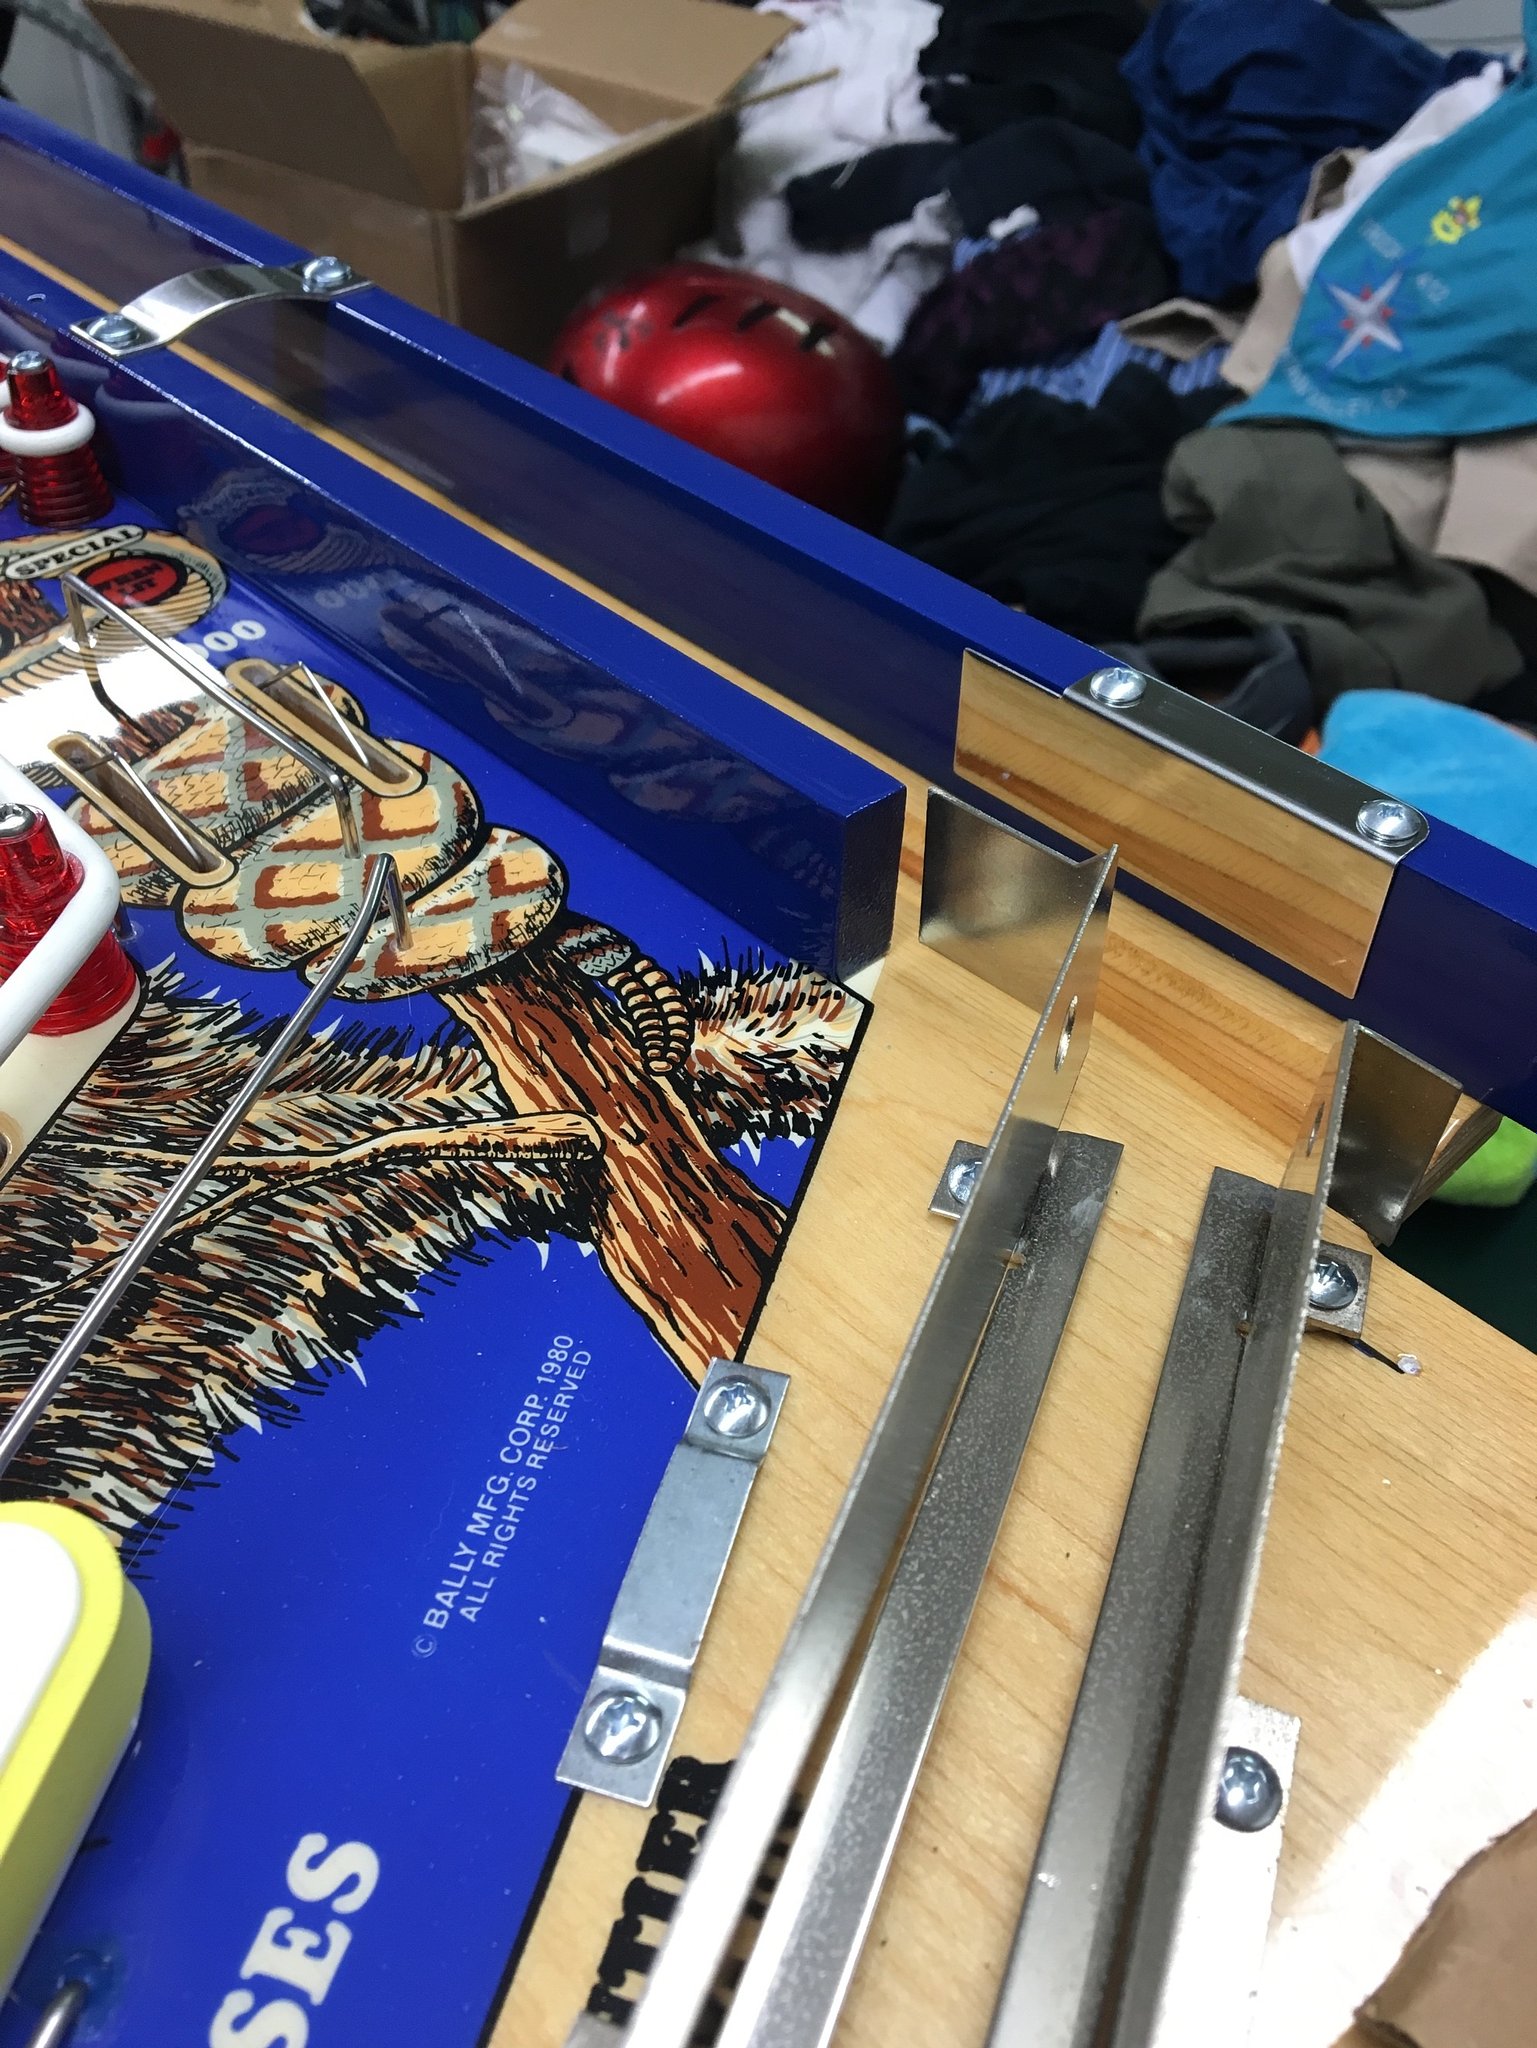
Quoted from Tbgolfen:Here is a pic of the rails on the playfield.
That is definitely pinball porn!
Yves
Quoted from Cigaretteman:Fantastic work! What finish are on the coin door? Is it polished or chrome?
I personally like the look of polished metal. Granted it is much more difficult to maintain then chrome. The general rule I follow is polish it if possible and powder coat or chrome when needed.
Side rails, coin door and trim are polished. Back grill and legs are chrome.
The clear coat came out great. What did it look like prior to wet sanding and buffing? Did it have much orange peel?
Quoted from RyanClaytor:This is like a museum piece.
Just have to say; I'm SOOO happy you are indulging all of us with such a thorough documentation of this process. Many thanks. I hope to one day see it in person.
PM me whenever your in SoCal. I just need a copy of your birth certificate and drivers license. ![]()
I am going to have me some crickets rocking the game room.
image_(resized).jpeg
Quoted from PinballMikeD:The clear coat came out great. What did it look like prior to wet sanding and buffing? Did it have much orange peel?
I usually end up with quite a bit of orange peel. When we paint my buddies 72 nova we are building a booth in our friends warehouse. Hopefully that will become my new spot to shoot!!
I did a favor for a friend and sprayed his hoops. It came out with very little orange peel. Spraying flat sure helps. This pic is before color sanding and buffing.
image_(resized).jpeg
After sanding and buffing. Not perfect but looks great in a pinball machine!
image_(resized).jpeg
Quoted from iron00monkey:You should probably get some real snake skin and fur on there somewhere
Not a bad idea. Maybe a bear skin rug underneath it. ![]()
Quoted from Tbgolfen:Not a bad idea. Maybe a bear skin rug underneath it.
perfect, and mount a deer head for the topper, or a buffalo head ![]() -
-
Quoted from Tbgolfen:Decided to put some fresh lumber inside the cab to give it that frontier feel. Decided not to clear or lacquer it. Really like the ruggedness of it.
Very nice touch...great idea ![]()
Quoted from Tbgolfen:Decided to put some fresh lumber inside the cab to give it that frontier feel. Decided not to clear or lacquer it. Really like the ruggedness of it.
I like the idea.
Not that you asked for it, but this is one thing I would do differently. Given all the coil dust and funk (I assume you are going to play this beauty once all done with it) I would knock down the back just slightly and seal that piece of wood. No way to clean coil dust from exposed bark. Just my thoughts that function/form should hold true over art when dealing with a beautiful mechanical piece of art like this.
I had a bad experience today putting in the chrome bolts from pinballdecals.com. Instead of having my plater chrome some bolts for me, I decided to try something new. The bolts arrived and looked good. I didn't care for the angular look of the heads but decided to install them anyway. The first couple turns I knew I was in trouble as the chrome was pretty thick on the threads.
I did the usual a couple turns in and back it back out. I added some oil to help lubricate and was thinking to myself the whole time why am I doing this. As luck would have it, the bolt seized on the plate and it wouldn't budge forward or back. The only thing to do at that point was to back it out with force and hope. SNAP! Broken bolt. Drilled out the bolt in the plate but ended up breaking the weld on the plate. Oh well. Lesson learned.
Like I said I have no idea if others have had a similar experience but I will go back to my metal plater and have him chrome the head and shaft and leave the threads raw.
image_(resized).jpeg
I have 7 chrome bolts if anybody needs some. Use at your own risk.
Sorry to hear about the issue and now a delay.....this project has been so awesome to watch...luckily this snag is pretty minor ![]()
Quoted from Captive_Ball:...luckily this snag is pretty minor
Agreed! I was reading Tbgolfen's updated and fearing something happened to the cabinet and/or artwork. *phew* Could have been a lot worse! ![]()
Quoted from Whysnow:I like the idea.
Not that you asked for it, but this is one thing I would do differently. Given all the coil dust and funk (I assume you are going to play this beauty once all done with it) I would knock down the back just slightly and seal that piece of wood. No way to clean coil dust from exposed bark. Just my thoughts that function/form should hold true over art when dealing with a beautiful mechanical piece of art like this.
Yeah could get dirty but replacing that piece of wood if it does down the line isn't that big of a deal, I would keep it for the cool factor.
Quoted from RyanClaytor:Agreed! I was reading Tbgolfen's updated and fearing something happened to the cabinet and/or artwork. *phew* Could have been a lot worse!
All is good with the art. Before I started hacking away I removed the bracket and stood clear of the cabinet. Even I have brief moments of sanity.
Terry will be working on the back box this coming weekend! If all goes well, I hope to clear coat Wednesday and sand and polish over the next weekend. Fingers crossed, Frontier will be up and playing before the end of summer. Still have to make some plastics and finish the apron.
The extra time will only cost me more money as I found some parts that I might as well chrome now that I have to send in the bolts. ![]()
This machine is incredible what a fantastic job you are doing ![]() . Frontier has always been one of my favorites, the one pinball that held my interest as a kid growing up and what created my love for the game. Someday I have to play this game of yours, it looks incredible and I wish to see it and play it in person! Thanks for making this thread for us all to live through the restoration/recreation you have going here. If you ever decide to sale this game, which i doubt, I call Dibs first LOL
. Frontier has always been one of my favorites, the one pinball that held my interest as a kid growing up and what created my love for the game. Someday I have to play this game of yours, it looks incredible and I wish to see it and play it in person! Thanks for making this thread for us all to live through the restoration/recreation you have going here. If you ever decide to sale this game, which i doubt, I call Dibs first LOL ![]()
![]()
Quoted from CaptainNeo:Shouldn't you be using wooden dowels for bolts for this game anyway. goes with the theme.
And maybe some hand-hewn playfield rails. Where's Taylor VA when you need him? ![]()
Quoted from Tbgolfen:I have 7 chrome bolts if anybody needs some. Use at your own risk.
Why don't you just run these bolts through a die and cut the out of tolerance chrome plating off of the threads. That would be another solution - along with getting an 8th bolt.
Quoted from Pinballlew:This machine is incredible what a fantastic job you are doing . Frontier has always been one of my favorites, the one pinball that held my interest as a kid growing up and what created my love for the game. Someday I have to play this game of yours, it looks incredible and I wish to see it and play it in person! Thanks for making this thread for us all to live through the restoration/recreation you have going here. If you ever decide to sale this game, which i doubt, I call Dibs first LOL
Thanks! You got dibs for 1 million dollars. ![]()
Quoted from CaptainNeo:Shouldn't you be using wooden dowels for bolts for this game anyway. goes with the theme.
Do those wooden dowels you speak of come in chrome?
So the good news is I will have some pics to share of the backbox this weekend. Should be able to tighten up the finishing on the lower cabinet as well. Feels like I am getting closer. Of course, once I start sanding and buffing the finish will feel a million miles away again.
My land. Just when I thought it was done...more incredible work from Terry. Maybe you can convince him to keep going. There are a couple more surfaces he could paint, such as the top of the backbox, the bottom of the cabinet...just some suggestions. ![]() I hate to think his work is almost finished. What would it take to convince him to do another game???
I hate to think his work is almost finished. What would it take to convince him to do another game??? ![]()
Sincerely,
Ryan
Wanna join the discussion? Please sign in to reply to this topic.

Great to see you're enjoying Pinside! Did you know Pinside is able to run without any 3rd-party banners or ads, thanks to the support from our visitors? Please consider a donation to Pinside and get anext to your username to show for it! Or better yet, subscribe to Pinside+!

This page was printed from https://pinside.com/pinball/forum/topic/bally-frontier-restoration-and-custom-artwork/page/7 and we tried optimising it for printing. Some page elements may have been deliberately hidden.
Scan the QR code on the left to jump to the URL this document was printed from.
 København