(Topic ID: 192072)

Attack From Mars Remake (AFMr) Owners Club

By Pin_Guy

6 years ago


Topic Heartbeat

Topic Stats

  • 10,558 posts
  • 720 Pinsiders participating
  • Latest reply 22 hours ago by Lethal_Inc
  • Topic is favorited by 334 Pinsiders

You

Linked Games

Topic Gallery

View topic image gallery

624D70E8-C6B0-4450-8701-B57F9551F120 (resized).jpeg
IMG_0612 (resized).JPG
IMG_0590 (resized).JPG
IMG_0589 (resized).JPG
82811421-ED1C-4870-B24A-B741D5DE9D2A (resized).jpeg
IMG_0547 (resized).JPG
Screenshot_20240318_092901_Gallery (resized).jpg
Screenshot_20240318_092838_Gallery (resized).jpg
pasted_image (resized).png
IMG_0458 (resized).JPG
IMG_0459 (resized).JPG
pasted_image (resized).png
IMG_0457 (resized).JPG
IMG_0456 (resized).JPG
IMG_3716 (resized).jpeg

Topic index (key posts)

26 key posts have been marked in this topic, showing the first 10 items. (Show topic index)

There are 10,558 posts in this topic. You are on page 160 of 212.
#7951 4 years ago
Quoted from pinballinreno:

One of the keys to RTU is to ignore the mothership and cities.
They will be taken care of almost accidentally during multiballs and the other activities.

I watched the video recently posted of some guy who really knew what he was doing. Part of me wants to try to follow his methodology, but the other part of me wants to keep things more fun/game like instead of business/task centered.

#7952 4 years ago

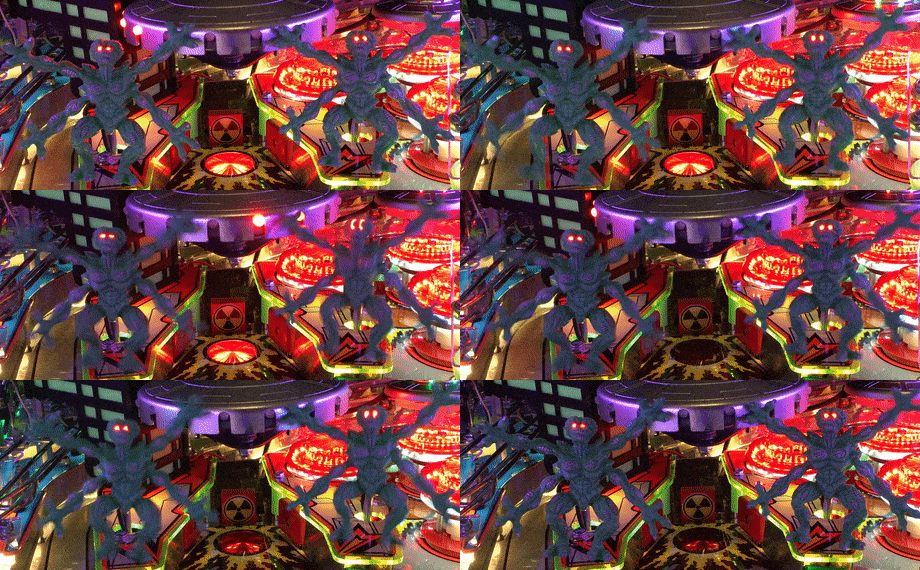
So I decided to pick up a couple of Big-O Jiggly Marians with Glowing Red LED Eyes from Mick's Pinball | https://www.mickspinball.com/big-o-jiggly-martian-add-on

I really wanted red eyes, but didn't want to take the time or effort of going the DIY path. The two Martians arrived today, so I thought I would share. First of all, I really like them. They are slightly larger than the standard ones, and they are more rubbery which gives them additional jiggle. As I did with my originals, I decided to color the muscles with a metallic silver Sharpie to match the LE topper (I also used a red Sharpie around the eyes).

By default, the Martians come fully wired and ready to install. You simply slide the original Martians off their metal brackets and slide these on. I did remove them so that I could feed the wiring down through an opening where the shaft that shakes them comes up from below the playfield (it helps to loosen the 4 screws on the bottom of the playfield holding the coil bracket while installing to enlarge the gap). Mick includes clip on wire connectors, but I wanted the installation to be a little less permanent. My solution was to create a wiring harness with a splitter and to solder on connectors to the end of each Martian cable using some Comet Matrix wiring/connectors. I also inserted a Matrix brightness controller to tone things down just a bit as the LEDs used are surprisingly bright. It all came together nicely, then I just used the pigtail to tap into existing GI bulb wiring.

I really like the red glow of the eyes and the jiggliness of the Martians. Now, I just need two more of them.
IMG_3158.JPGIMG_3158.JPGIMG_3156.JPGIMG_3156.JPGIMG_3157.JPGIMG_3157.JPGIMG_3159.JPGIMG_3159.JPGIMG_3160.JPGIMG_3160.JPGIMG_3162.JPGIMG_3162.JPG
2Martians.gif2Martians.gif

#7953 4 years ago
Quoted from Mr_Tantrum:

So I decided to pick up a couple of Big-O Jibbly Marians with Glowing Red LED Eyes from Mick's Pinball | https://www.mickspinball.com/big-o-jiggly-martian-add-on
I really wanted red eyes, but didn't want to take the time or effort of going the DIY path. Anyway, the two Martians arrived today, so I thought I would share. First of all, I really like them. They are slightly larger than the standard ones, and they are more rubbery which gives them additional jiggle. As I did with my originals, I decided to color the muscles with a metallic silver Sharpie to match the LE topper.
By default, the Martians come fully wired and ready to install. You simply slide the original Martians off their metal brackets and slide these on. I did remove them so that I could feed the wiring down through an opening where the shaft that shakes them comes up from below the playfield (it helps to loosen the 4 screws on the bottom of the playfield holding the coil bracket while installing to enlarge the gap). Mick includes clip on wire connectors, but I wanted the installation to be a little less permanent. My solution was to create a wiring harness with a splitter and to solder on connectors to the end of each Martian cable using some Comet Matrix wiring/connectors. It all came together nicely, then I just used the pigtail to tap into existing GI bulb wiring.
I really like the red glow of the eyes and the jiggliness of the Martians. Now, I just need two more of them.
[quoted image][quoted image][quoted image][quoted image][quoted image][quoted image][quoted image]

OK...those are pretty cool.

I could see $30 each for the non lighted ones as a reasonable cost. I mean...that would be hard to reproduce. I have no idea how he even made those. My imagination suggests like...a 3d scan of on original martian, then enlarge the scan by 20%, 3d print it, then use the 3d print to make a mold, and then use an injector to pipe in the rubbery substance into the mold? I can't do any one step of that.

But....adding $40 each to drill a hole into the eye socket and add $1 of micro leds? Especially since just like you, I would be making my own wiring harness for this since I don't want to crimp into the original wires on the machine.

That seems like an excessive cost for the lighted ones.

I was thinking maybe I should just drill holes into my existing martians eyes to add the lights. If I mess up...I can get replacement ones for $25 from pinball life. Though replacements at $25....might as well just get the extra large jiggly ones...

#7954 4 years ago

Mr_Tantrum, Thank you very much for the honest write up and pictures..looks great..

Gogdog, FYI I certainly do not have any of the listed tools to have made these..(interesting concept though)..I just hired out a mold maker, per my new sizing and detailed design. For those that understand the cost involved with a project like this, I hope folks can appreciate my cost for the mold being quite a few thousand dollars,,,If I remember correctly the mold I had built for me many years ago for my laser cannons was about $4,900,..plus of course, the material and labor to manufacture...It takes a few years to just recoup the initial cost/s..

Regarding the way Mr_Tantrum wired them in, I thought about doing it that way, but I really do not understand what is wrong with just tapping into the existing wiring, nothing permanent and no cutting of the wires, Oh well, I do have the red IDC and the Z connectors if anyone would want those pieces to put together the additional wiring by themselves..but I do not have the white connectors or wired tails that are shown in the above pictures.

Thank you very much for the input,
Mick

PS it is a bit more detailed, (tedious) with installing the LED's than just drilling a few holes and stuffing in the LED's..anyone else ever work with 36 gauge wiring?

#7955 4 years ago
Quoted from TheMickster:

Regarding the way Mr_Tantrum wired them in, I thought about doing it that way, but I really do not understand what is wrong with just tapping into the existing wiring, nothing permanent and no cutting of the wires

In case I didn't state it clearly enough for those considering buying the red-eyed Martians, the kit includes everything you need to install them. Normally, I probably would have just used the included wire taps, but since I've added all my other lighting mods with my homemade wiring harnesses I decided to follow suit with these. My way is absolutely not required, and probably over the top for most.

I would also say then when inspecting Mick's Martians, I was very impressed with how they are wired. I can only imagine what it takes to work with the wiring that looks barely thicker than thread. The whole mod is excellent quality, constructed quite well, and I highly recommend them to anyone who wants to stare at red beady Martian eyes while blasting their flying saucers out of the sky.

#7956 4 years ago
Quoted from TheMickster:

Mr_Tantrum, Thank you very much for the honest write up and pictures..looks great..
Gogdog, FYI I certainly do not have any of the listed tools to have made these..(interesting concept though)..I just hired out a mold maker, per my new sizing and detailed design. For those that understand the cost involved with a project like this, I hope folks can appreciate my cost for the mold being quite a few thousand dollars,,,If I remember correctly the mold I had built for me many years ago for my laser cannons was about $4,900,..plus of course, the material and labor to manufacture...It takes a few years to just recoup the initial cost/s..

Yeah...I thought it would be super hard to make those Jiggly Martians. I think your pricing is great on the nonlighted versions, especially since normal sized replacements are $26...so $29 for larger, jigglier ones sound great. Especially with the investment that you put into the mold. (and...getting the molds filled with whatever substance these gets made with..PLUS..the painting involved...etc).

Quoted from TheMickster:

Regarding the way Mr_Tantrum wired them in, I thought about doing it that way, but I really do not understand what is wrong with just tapping into the existing wiring, nothing permanent and no cutting of the wires, Oh well, I do have the red IDC and the Z connectors if anyone would want those pieces to put together the additional wiring by themselves..but I do not have the white connectors or wired tails that are shown in the above pictures.
Thank you very much for the input,
Mick

I think most people don't like tapping into existing wiring since it doesn't create a super solid connection, and it does cut into the wiring, (even if just a little bit). If you already have the red IDC and z connectors, offering the white JST connectors are way cheaper. You can get 50 pairs of JST 2.0 connectors (like what comet uses) for $1.80 shipped free from china (I still have no idea how they make any money off most stuff from aliexpress). And they already soldered wire to the connectors on the male side! https://www.aliexpress.com/snapshot/0.html?spm=a2g0s.9042647.6.2.503b4c4dUzm2Og&orderId=97964060256474&productId=32848166904

Quoted from TheMickster:

PS it is a bit more detailed, (tedious) with installing the LED's than just drilling a few holes and stuffing in the LED's..anyone else ever work with 36 gauge wiring?

You are right...I shouldn't have passed judgement on the pricing for the lighted aliens until I had tried it myself and known for myself how hard it is to get tiny wires through the eyes on the martians. I'm sorry about that.

#7957 4 years ago

Thank you for the understanding, and kind words...Just trying to make great stuff for our community...

#7958 4 years ago

I bought two of the unlit and two of the ones with the LED eyes. They look fantastic on the machine and I have gotten a lot of positive feedback from people who have come over to play pinball on my AFMr. Everyone liked the Glowing eyes as well as the increased Jiggly.

Before I bought the Martians from Mick, I did some looking around for other Martians with LED eyes. I was only able to find a couple of other options which were much more expensive. There was a set of 2 used ones for $180 or a regular sized Martian with LED eyes for $115 each. So, I didn't have an issue with the pricing. Also, as someone who does not have a ton of experience working on Pinball machines, I thought the installation process was pretty simple.

Apologies for the poor quality of the attached pictures.

IMG_7940 (resized).jpgIMG_7940 (resized).jpgIMG_7942 (resized).jpgIMG_7942 (resized).jpg
#7959 4 years ago

Thank you all for the great feedback....a lot of folks are now enjoying the new jiggly, and a bit larger Martians on their machines....now you can actually see them on the playfield, and they are not like the smaller "stiffs", being sent out with the new machines..

Mick

https://www.mickspinball.com/big-o-jiggly-martian-add-on

PS and all of my products, are tested before shipping, second picture here....

ebaynoleds1 (resized).jpgebaynoleds1 (resized).jpglighted 1 (resized).jpglighted 1 (resized).jpg
#7960 4 years ago
Quoted from PinThrift:

I bought two of the unlit and two of the ones with the LED eyes. They look fantastic on the machine and I have gotten a lot of positive feedback from people who have come over to play pinball on my AFMr. Everyone liked the Glowing eyes as well as the increased Jiggly.
Before I bought the Martians from Mick, I did some looking around for other Martians with LED eyes. I was only able to find a couple of other options which were much more expensive. There was a set of 2 used ones for $180 or a regular sized Martian with LED eyes for $115 each. So, I didn't have an issue with the pricing. Also, as someone who does not have a ton of experience working on Pinball machines, I thought the installation process was pretty simple.
Apologies for the poor quality of the attached pictures.[quoted image][quoted image]

They're so cute!

#7961 4 years ago

I received the V2.0 chip and just want to know if it’s plug and play. Pull the old chip out, install the new one, turn the game on and play? I think the only thing I want to adjust right now is the flipper strength, lower it just a bit.

#7962 4 years ago
Quoted from Lethal_Inc:

I received the V2.0 chip and just want to know if it’s plug and play. Pull the old chip out, install the new one,

Yes. Be sure the notch on the chip is in the same spot as the old one was and the notch on the board. Never trust labels on chips.

LTG : )

#7963 4 years ago
Quoted from LTG:

Be sure the notch on the chip is in the same spot as the old one was and the notch on the board.

See the small round dot. That is where pin one is.

LTG : )

DSC00481 (resized).JPGDSC00481 (resized).JPG
#7965 4 years ago

I love these

#7966 4 years ago

Has anyone besides me, ever asked Chicago Gaming if the smaller LED lighted saucers are available as a kit for the SE and the CE versions?

They did not respond, and I have not seen anywhere for this option, even an aftermarket like Bill Ung offered for the original design many years ago..

#7967 4 years ago
Quoted from TheMickster:

Has anyone besides me, ever asked Chicago Gaming if the smaller LED lighted saucers are available as a kit for the SE and the CE versions?

They aren't available.

LTG : )

#7968 4 years ago

Thank you Lloyd, but do you know why as I am sure it would be a great seller for them?

I might have to come up with something myself...

#7969 4 years ago
Quoted from TheMickster:

Thank you Lloyd, but do you know why as I am sure it would be a great seller for them?
I might have to come up with something myself...

To keep the LE “limited” would be my guess.

#7970 4 years ago

The Fantastic topper and mirror blades etc... would accomplish that I would think...Oh well.

Thank you all for the input..darn...

#7971 4 years ago

One update that would be awesome would be to customize the color leds on the main saucer. I'd love to have it flash orange when it blows up.

#7972 4 years ago

Joined the club today.

2D375C5B-2EE5-4DD2-BDF2-351D51353AAC (resized).jpeg2D375C5B-2EE5-4DD2-BDF2-351D51353AAC (resized).jpeg
#7973 4 years ago

Does anyone have, or know where I can get, the England voice saying "bye bye for now"? My wife absolutely loves that quote, and will come running in to say it when it happens. I'd like to set it as her text ringtone or something of that nature.

#7974 4 years ago

Still getting air balls even with the flippers turned down to -3 and pitch at 6.5 degrees. Thinking of making it steeper (7 degrees or 7.5). Anyone else run their machine at a steeper pitch/angle?

#7975 4 years ago
Quoted from ausretrogamer:

Still getting air balls even with the flippers turned down to -3 and pitch at 6.5 degrees. Thinking of making it steeper (7 degrees or 7.5). Anyone else run their machine at a steeper pitch/angle?

I play mine at 7.2ish with the flippers on normal power. I don't have an issue with airballs.

#7976 4 years ago
Quoted from atrainn:

I play mine at 7.2ish with the flippers on normal power. I don't have an issue with airballs.

Thank you for your confirmation. Time to steepen the gradient and get flipping

#7977 4 years ago

Hi all. Have joined the club and love the game. I am one issue with my new game and its rattles. They sound like a faulty speaker but no. I then thought it was the glass rattling and put some electrical tape down the sides of the glass, this made no difference. I then worked out the rattle is coming from the stainless trim running up each side of the game. When I put some pressure on the stainless trims ‘all’ the rattles go away. Has anyone had this problem and if so how did you fix it? It’s really frustrating for a new game.

Thanks Craig

7C684CB2-DFD0-40B9-83DE-ED21946E9900 (resized).jpeg7C684CB2-DFD0-40B9-83DE-ED21946E9900 (resized).jpeg
#7978 4 years ago
Quoted from maffewl:

Does anyone have, or know where I can get, the England voice saying "bye bye for now"? My wife absolutely loves that quote, and will come running in to say it when it happens. I'd like to set it as her text ringtone or something of that nature.

I think it's actually "that's all for now". I downloaded all the call outs a few years ago. I forget where I got them or I would just post that link. But PM me and I can send it to you or any other one for that matter.

#7979 4 years ago

Please santa human, I've been a good Martian...(last night)

20191225_093323 (resized).jpg20191225_093323 (resized).jpg
#7980 4 years ago

Mmm more women...(this morning)

20191225_095441 (resized).jpg20191225_095441 (resized).jpg
#7981 4 years ago
Quoted from maffewl:

Does anyone have, or know where I can get, the England voice saying "bye bye for now"? My wife absolutely loves that quote, and will come running in to say it when it happens. I'd like to set it as her text ringtone or something of that nature.

I downloaded them all from pinsound, can email it to you if you like.

#7982 4 years ago

DE5EFB8A-4A3D-407E-9380-854482B59389 (resized).jpegDE5EFB8A-4A3D-407E-9380-854482B59389 (resized).jpegI installed the V2.0 chip and now the game has no sound and won’t eject ball into play when starting a game. I lined chip up properly and is inserted all the way.
Edit: the game goes in and out on the sound and coils working.

#7983 4 years ago
Quoted from Lethal_Inc:

What did I do wrong?

Try the old chip. Maybe the new one is bad ?

LTG : )

#7984 4 years ago

Put old chip in and it works fine.

#7985 4 years ago
Quoted from Lethal_Inc:

Put old chip in and it works fine.

Your 2.0 chip is cactus. Get onto CGC (raise a support ticket for a replacement).

#7986 4 years ago

I put a request for a new V2.0 chip in my existing ticket. Every once in a while after destroying a saucer the ball stays there instead of going to the VUK. I have to push the machine from the right side to get it to go to the VUK and continue play. Is there an adjustment in there that will make the ball consistently go to the VUK?

#7987 4 years ago
Quoted from Lethal_Inc:

Is there an adjustment in there that will make the ball consistently go to the VUK?

Anything stuck in the subway to the VUK ? Assembled right, all down hill, no lips ?

LTG : )

#7988 4 years ago

It doesn’t do it all the time so it must just need an adjustment, more slope or downhill but I guess I need to remove it and check, which I would rather not do.

#7989 4 years ago
Quoted from HeadNZ:

Hi all. Have joined the club and love the game. I am one issue with my new game and its rattles. They sound like a faulty speaker but no. I then thought it was the glass rattling and put some electrical tape down the sides of the glass, this made no difference. I then worked out the rattle is coming from the stainless trim running up each side of the game. When I put some pressure on the stainless trims ‘all’ the rattles go away. Has anyone had this problem and if so how did you fix it? It’s really frustrating for a new game.
Thanks Craig[quoted image]

Mine was rattling and it went away as well when I pushed on the trim even after putting some tape on my invisiglass. I realized it needed more electrical tape and viola it worked! I would Try to go thicker with the tape
It worked for me

#7990 4 years ago

Got my Big O jiggly martians installed. Very easy to do. I went with 2 led lighted eyes and 2 normal ones. Thanks for a super cool mod. Saw it here

45B3F3CB-D7D4-48C0-A8A3-8432525048D5 (resized).jpeg45B3F3CB-D7D4-48C0-A8A3-8432525048D5 (resized).jpeg6B8C414A-F6F2-4975-8878-A5F543DFBB00 (resized).jpeg6B8C414A-F6F2-4975-8878-A5F543DFBB00 (resized).jpegC7E02E96-AD36-45EE-B34B-F8E74A75DEC9 (resized).jpegC7E02E96-AD36-45EE-B34B-F8E74A75DEC9 (resized).jpegCA1130A3-5EEC-4008-8C6C-FE2EFEACF0FA (resized).jpegCA1130A3-5EEC-4008-8C6C-FE2EFEACF0FA (resized).jpegEE8D7343-AF8A-4F96-936C-8395967E8705 (resized).jpegEE8D7343-AF8A-4F96-936C-8395967E8705 (resized).jpeg
#7991 4 years ago
Quoted from Aflacjack:

Got my Big O jiggly martians installed. Very easy to do. I went with 2 led lighted eyes and 2 normal ones. Thanks for a super cool mod. Saw it here[quoted image][quoted image][quoted image][quoted image][quoted image]

They look great!

#7992 4 years ago

So, here is my latest mod - fluorescent green star posts with LED post lights. I really like how they turned out, and the fluorescent green goes perfectly with he overall color scheme. The photos don't quite do things justice, but I did the best I could with a camera phone.

Not an exact quantity inventory (didn't count wires or splitters, but I can if anyone is interested), but here is what I used to accomplish this:
- 9 x fluorescent green star posts | https://www.pinballlife.com/fluorescent-green-transluscent-star-post-1-116-tall.html
- 8 x cool white Matrix star post lights: https://www.cometpinball.com/products/star-post-lights?variant=29411774201958
- multiple 2-way & 3-way Matrix splitters | https://www.cometpinball.com/products/matrix-splitter-wires
- multiple 6" & 12" Matrix extensions | https://www.cometpinball.com/products/matrix-extension-wires
- 1 x Matrix Brightness Adjuster (all posts run up to this single adjuster) | https://www.cometpinball.com/products/brightness-adjusters?variant=12493660618796
- 1 x my custom AFMr wiring harness | Mezel's version is here: https://mezelmods.com/collections/under20/products/4-pin-100-idc-assembly

Before: Red posts with Titan GITD ring
IMG_3175 (resized).JPGIMG_3175 (resized).JPG

After: Fluorescent green posts with Titan GITD ring
IMG_3176 (resized).JPGIMG_3176 (resized).JPG

Fluorescent green posts with post LEDs
IMG_3185 (resized).JPGIMG_3185 (resized).JPGIMG_3184 (resized).JPGIMG_3184 (resized).JPGIMG_3186 (resized).JPGIMG_3186 (resized).JPGIMG_3187 (resized).JPGIMG_3187 (resized).JPG

Lower playfield: Game off
IMG_3182 (resized).JPGIMG_3182 (resized).JPG

Lower playfield: Game on
IMG_3198 (resized).JPGIMG_3198 (resized).JPG

Ball eject post (I didn't light this one since it is out of player's view)
IMG_3188 (resized).JPGIMG_3188 (resized).JPG

#7993 4 years ago
Quoted from Mr_Tantrum:

So, here is my latest mod - fluorescent green star posts with LED post lights. I really like how they turned out, and the green goes perfectly. The photos don't quite do things justice, but I did the best I could with a camera phone.
Not an exact quantity inventory (didn't count wires or splitters, but I can if anyone is interested), but here is what I used to accomplish this:
- 9 x fluorescent green star posts | https://www.pinballlife.com/fluorescent-green-transluscent-star-post-1-116-tall.html
- 8 x cool white Matrix star post lights: https://www.cometpinball.com/products/star-post-lights?variant=29411774201958
- multiple 2-way & 3-way Matrix splitters | https://www.cometpinball.com/products/matrix-splitter-wires
- multiple 6" & 12" Matrix extensions | https://www.cometpinball.com/products/matrix-extension-wires
- 1 x Matrix Brightness Adjuster (all posts run up to this single adjuster) | https://www.cometpinball.com/products/brightness-adjusters?variant=12493660618796
- 1 x my custom AFMr wiring harness | Mezel's version is here: https://mezelmods.com/collections/under20/products/4-pin-100-idc-assembly
Before: Red posts with Titan GITD ring
[quoted image]
After: Fluorescent green posts with Titan GITD ring
[quoted image]
Fluorescent green posts with post LEDs
[quoted image][quoted image][quoted image][quoted image]
Lower playfield: Game off
[quoted image]
Lower playfield: Game on
[quoted image]
Ball eject post (I did not light this one since it is out of player's view)
[quoted image]

Ok...those look good. A lot better than the UV lights and GITD star posts that I tried to do. And I didn't think about doing those other star posts on the side....(so 8 lights total)...nice job there.

#7994 4 years ago
Quoted from Gogdog:

Ok...those look good. A lot better than the UV lights and GITD star posts that I tried to do. And I didn't think about doing those other star posts on the side....(so 8 lights total)...nice job there.

Yeah, I really like them more after playing at night without ambient lighting. They were super bright before I put the brightness controller inline, but very nice brightness now.

#7995 4 years ago

Does anyone know if the coin reject button assemblies the HAPP versions like they use in Stern's? If so, I'm thinking about switching to green ones.

#7996 4 years ago

Just finished my custom reject button inserts. Similar to others, but I added the cow in the tractor beam. Happy to share, just PM me if you would like to have them. For those who have never replaced these, it is fairly simple once you figure out how.

I suggest printing the inserts on a thick nice paper (I used ultra gloss photo paper).

1) Turn off pin then open the coin door and push in one of the buttons.
2) You'll notice a "C" pin around the end of the metal shaft attached to the button - use needle nose pliers to pull off while holding the button from the front as the spring will pop it out (notice how the spring is oriented). Repeat for the second button.
3) The paper insert slides in from one end while the other end is partially open to catch it. Use a razor knife to push from the partially open end to where the paper insert slides out of the other end, and repeat for other button.
4) Pun the new paper inserts into the slot and orienting them so that the fully open slot is at the top. You may need to use a razor knife to push the insert all the way in.
5) Put a spring over the insert shaft (small end of the spring by the button and large end goes into the housing), orient correctly, then reseat button. While holding the button all the way in, use needle nose pliers to reseat the "C" pin and repeat for second insert.
6) Close the door, power on pin, and enjoy your new custom inserts!

AFMr Inserts (resized).jpgAFMr Inserts (resized).jpg

Pin Off
IMG_3190 (resized).JPGIMG_3190 (resized).JPG

Pin On
IMG_3191 (resized).JPGIMG_3191 (resized).JPG

#7997 4 years ago

Well, after installing two of the Mick's Pinball red-eyed Martians, I just had to complete the set. Received them today, did my typical silver coloring, and installed them onto the same circuit as the other two to ensure the same eye brightness (I have a brightness adjuster inline).

I think they really look great, and highly recommend them.
IMG_3192 (resized).JPGIMG_3192 (resized).JPGIMG_3193 (resized).JPGIMG_3193 (resized).JPGIMG_3194 (resized).JPGIMG_3194 (resized).JPGIMG_3195 (resized).JPGIMG_3195 (resized).JPG

#7998 4 years ago

At this point, I think I'm just about done with the mods once I make sure the green HAPP reject buttons are what I need for this game. I do have one other thing I would like to do, as I'm not particularly a fan of the backboard graphic. I think I'm going to go with the cityscape on the backboard, but need to figure out what all is involved to make this happen. Has anyone changed theirs, and if so would you mind sharing pics along with the procedure?

AFM_Backboard (resized).jpgAFM_Backboard (resized).jpg
#7999 4 years ago

The Big-O Jiggly Martians look cool, but I do not want to permanently connect them using wire taps. Mods should be able to be reversed.

#8000 4 years ago
Quoted from evh347:

The Big-O Jiggly Martians look cool, but I do not want to permanently connect them using wire taps. Mods should be able to be reversed.

Easily done, and I'm happy to walk you through process and let you know everything you will need to accomplish it if/when the time comes that you decide you want to move forward. Will add approximately $15-$25 to the project depending upon a couple of options.

Promoted items from Pinside Marketplace and Pinside Shops!
5,400
$ 249.99
Playfield - Toys/Add-ons
PinballGeek
 
$ 17.50
Cabinet - Other
Rocket City Pinball
 
$ 15.00
Playfield - Protection
Pinhead mods
 
From: $ 15.00
Cabinet - Other
UpKick Pinball
 
From: $ 33.00
Gameroom - Decorations
Rocket City Pinball
 
$ 44.95
Playfield - Toys/Add-ons
PinBoss Mods
 
$ 40.00
Gameroom - Decorations
The Flipper Room
 
$ 39.50
Cabinet - Sound/Speakers
Pinball Haus
 
$ 79.00
$ 399.00
Cabinet - Decals
Mircoplayfields
 
From: $ 20.00
Various Novelties
Pinball Photos LLC
 
From: $ 1.00
Playfield - Other
Rocket City Pinball
 
From: $ 8.00
Cabinet - Other
NO GOUGE PINBALL™
 
$ 200.00
Playfield - Toys/Add-ons
Horror Mods
 
$ 16.95
Playfield - Toys/Add-ons
ULEKstore
 
$ 10.00
Playfield - Protection
UpKick Pinball
 
$ 12.00
Playfield - Decals
Metal-Mods
 
$ 30.00
Playfield - Other
YouBentMyWookie
 
12,000
Machine - For Sale
San Diego, CA
$ 119.99
Cabinet - (Alt) Translites
FlyLand Designs
 
$ 35.00
Cabinet - Other
Rocket City Pinball
 
There are 10,558 posts in this topic. You are on page 160 of 212.

Reply

Wanna join the discussion? Please sign in to reply to this topic.

Hey there! Welcome to Pinside!

Donate to Pinside

Great to see you're enjoying Pinside! Did you know Pinside is able to run without any 3rd-party banners or ads, thanks to the support from our visitors? Please consider a donation to Pinside and get anext to your username to show for it! Or better yet, subscribe to Pinside+!


This page was printed from https://pinside.com/pinball/forum/topic/attack-from-mars-remake-afmr-owners-club/page/160?hl=dashv and we tried optimising it for printing. Some page elements may have been deliberately hidden.

Scan the QR code on the left to jump to the URL this document was printed from.