When will you continue the assembly? ![]()
(Topic ID: 257696)
 Addams Family, The
Bally, 1992
Addams Family, The
Bally, 1992Quoted from russdx:When will you continue the assembly?
First, when the backboard parts arrive, then when the LED stuff arrives for thing. I will try my darndest to get the back board mostly setup in the next few weeks ![]() . may not be able to power it on yet, but will be getting there
. may not be able to power it on yet, but will be getting there ![]() .
.
Quoted from Shredder565:First, when the backboard parts arrive, then when the LED stuff arrives for thing. I will try my darndest to get the back board mostly setup in the next few weeks . may not be able to power it on yet, but will be getting there .
Powering it all up is pretty fulfilling!
You cant start a game, but you can test and play with the audio.
In many ways the cabinet is tougher than building a playfield.
Quoted from Shredder565:THING light finally shipped, DMD gets here tomorrow.
This will be an all LED addams family.
Long as its all Warm white GI ![]() (no colour puke) Only exception to that is BSD
(no colour puke) Only exception to that is BSD ![]() (looks great in blue)
(looks great in blue)
Only kidding do what ya want ![]()
Quoted from Pin-Pilot:DJI Phantom 4 as well. fun toys. Have you flown the Mavic?
Nope. only one drone, and I don't get it up as much as I'd like. i'm still scared to death of power failures or other things making it fall and crash ![]() .
.
I still want to take it up near a cliff that has an awesome view of NYC one of these days and try and get some fall colors in ![]() .
.
Quoted from Dan1733:Its going to look beautiful when its done
Want to sell it?? lol
I plan to keep it till I die ![]() . Too many arcades gone due to closures, fires, or other natural disasters
. Too many arcades gone due to closures, fires, or other natural disasters ![]() . At least I think In the Swing and Barnacle Bills is still around
. At least I think In the Swing and Barnacle Bills is still around ![]() .
.
Quoted from Shredder565:Nope. only one drone, and I don't get it up as much as I'd like. i'm still scared to death of power failures or other things making it fall and crash .
I still want to take it up near a cliff that has an awesome view of NYC one of these days and try and get some fall colors in .
I sold my Phantom 3 and bought a Mavic Pro. So compact and it flies better than the Phantom. Faster with longer range. The best part is its size and portability.
DJI is a good product. Never had any problems with it crashing unless I did something stupid.
Nice Neighborhood.
Here is a video I put together a few years ago sailing off the coast of So Cal.
Quoted from Pin-Pilot:I sold my Phantom 3 and bought a Mavic Pro. So compact and it flies better than the Phantom. Faster with longer range. The best part is its size and portability.
DJI is a good product. Never had any problems with it crashing unless I did something stupid.
Nice Neighborhood.
Here is a video I put together a few years ago sailing off the coast of So Cal.
far nicer locals ![]() . you can tell i'm still not comfy with it going anywhere other than above my head
. you can tell i'm still not comfy with it going anywhere other than above my head ![]() .
.
The HEP this week thread will be doing a video of a TAF restore , perhaps you should a peek! He's the God of Pinball restoration
Quoted from Shredder565:and I don't get it up as much as I'd like.
That's what she said
Quoted from WJxxxx:That's what she said
maybe one day,but not yet...sigh. short and beardless don't attract 'em ![]() .
.
Quoted from Shredder565:maybe one day,but not yet...sigh. short and beardless don't attract 'em
Never held me back. Granted, now I've got a sweet beard and I've been married for 25 years...so.....
Quoted from ThatOneDude:Never held me back. Granted, now I've got a sweet beard and I've been married for 25 years...so.....
always had a feeling I'd have better luck abroad than in the US. feel like women are a bit less picky abroad. If you look at US facebook husband photos, most are about a foot taller than the girl and bearded. ladies def have a type ;o).
luckily, I have projects to keep me from focusing on other great mysteries of the universe ![]() .
.
Quoted from Shredder565:always had a feeling I'd have better luck abroad than in the US. feel like women are a bit less picky abroad. If you look at US facebook husband photos, most are about a foot taller than the girl and bearded. ladies def have a type ;o).
luckily, I have projects to keep me from focusing on other great mysteries of the universe .
Gotta Luv those bearded ladies... ![]()
Quoted from pinballinreno:Gotta Luv those bearded ladies...
at this point, I might not turn one down for dinner ![]()
Quoted from Shredder565:always had a feeling I'd have better luck abroad than in the US. feel like women are a bit less picky abroad. If you look at US facebook husband photos, most are about a foot taller than the girl and bearded. ladies def have a type ;o).
I'm shorter than my wife. I'm sure that dating in the time of the plague isn't easy. Good luck, sir. We're rooting for you!
Quoted from Shredder565:always had a feeling I'd have better luck abroad than in the US. feel like women are a bit less picky abroad. If you look at US facebook husband photos, most are about a foot taller than the girl and bearded. ladies def have a type ;o).
luckily, I have projects to keep me from focusing on other great mysteries of the universe .
They ain’t that fussy over here ![]()
the other part is that the only time I see someone long enough to form a relationship seems to be at doctors offices heh.
can't ask someone out with a 1 second hi at a food store ;o).
maybe one day :/.
nice to be able to keep most of my paycheck this week. nothing 'urgent' to buy for pinball. and nothing else is giving me issues. hopefully this trend holds for a few weeks ![]() .
.
THING arrives tomorrow as do my back boards.
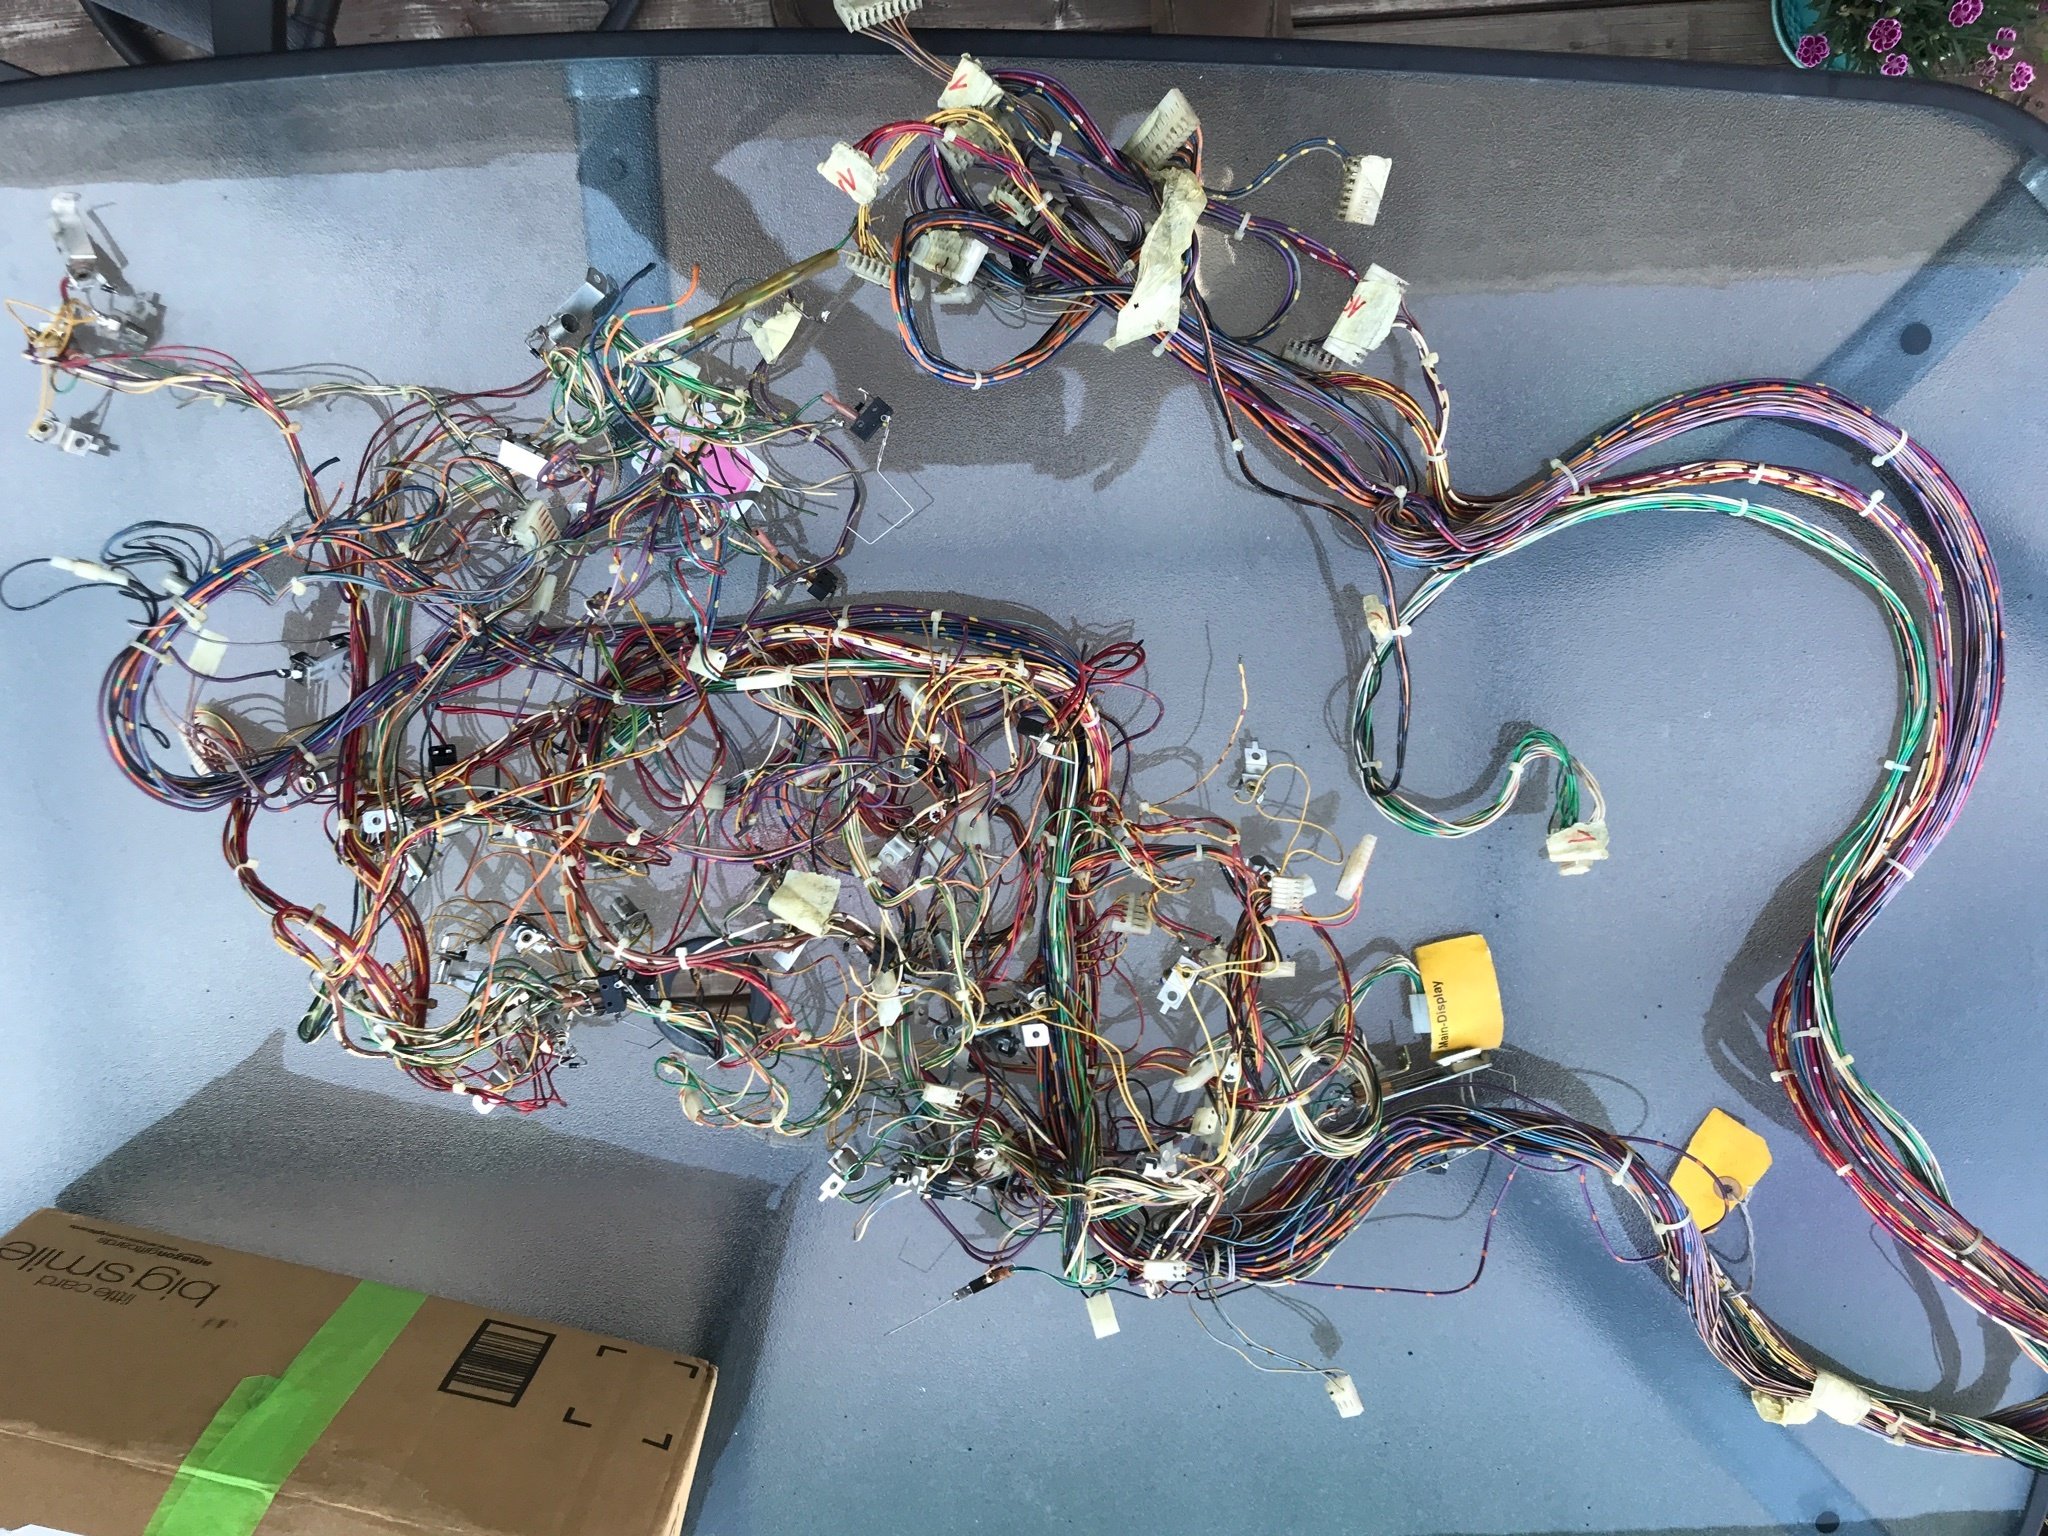
Quoted from russdx:Did your loom come with switches attached? Or do you need to solder then on
Might be a few on there.
I still havn't really taken it loose and inventorying it yet. will save that for absolute last ![]() .
.
wonderful post office reliability. nothing today heh.
Quoted from Shredder565:Might be a few on there.
I still havn't really taken it loose and inventorying it yet. will save that for absolute last .
https://images.pinside.com/5/07/50746071dcb1eb468247df13e2a90410790866c0/resized/large/50746071dcb1eb468247df13e2a90410790866c0.jpg
wonderful post office reliability. nothing today heh.
Looks like the switches are there!
Quoted from pinballinreno:Looks like the switches are there!
And the single lamps looking at the photo ![]()
Quoted from Davi:Try this: 4106-01115-06.
hmm, two in stock one out over on marco. will try some this week ![]() .
.
Quoted from Shredder565:forgot about the ones i had left over from the playfield build.
that just about works for a more or less complete thing panel set .
really wish i could turn it on
[quoted image]
You will get there.
Get the lower cabinet transformer power and cables set up.
That way you can flip the power switch and see power on your meter!
doesn't the backboards swing out? Not the cpu board, but the light board to get to the cpu?
does that look right?
Standoff clip #20-9534
Weight: 0.06 oz
Dimensions: 0.5 X 0.25 X 1
31
$1.89 $58.59
Machine Screw 8-32 x 1/2" p-ph-sems #4008-01003-08
Weight: 0.07 oz
Dimensions: 0.31 X 0.31 X 0.6
31
$0.15 $0.10 $3.10
Quoted from Shredder565:doesn't the backboards swing out? Not the cpu board, but the light board to get to the cpu?
does that look right?
Standoff clip #20-9534
Weight: 0.06 oz
Dimensions: 0.5 X 0.25 X 1
31
$1.89 $58.59
Machine Screw 8-32 x 1/2" p-ph-sems #4008-01003-08
Weight: 0.07 oz
Dimensions: 0.31 X 0.31 X 0.6
31
$0.15 $0.10 $3.10
The lightboard definitely swings out. its hinged on the left side and latched on the right.
Its one of the last things i install. It can get in the way while testing.
Quoted from Shredder565:doesn't the backboards swing out? Not the cpu board, but the light board to get to the cpu?
The official name that you'll find in the documentation for the light board is "insert". It's attached to the backbox with an idiosyncratic hinge system made up of these parts, which you can find on Marco:
Upper insert hinge assy, A-12497, attaches to top left corner of insert
Lower insert hinge assy, A-12498, attaches to bottom left corner of insert
Insert hinge mounting bracket, 01-6571, qty 2, attach to the inside left side wall of the backbox, mate with the hinge assy's
There's also a latch assembly that goes on the right side:
Insert top bracket, 01-6652
Insert latch, 01-6655
Insert stop bracket, 01-9047, qty 2
All of those seem nigh impossible to buy, so you might have to MacGuyver something out of sheet metal or 3D printing. I have a couple of machines from the same era that have the same parts, so I can post some pictures of those if it would be helpful.
Quoted from Stretch7:You have the stand off clips already ......i sent them with the cpu board as well as screws but i mentioned they were a different length but will still work.
I almost forgot about that bag. it fell out and was sitting almost under the desk. my bad. lot going on here last few days ![]() . Stupid virus changing rules every 2 months :/...
. Stupid virus changing rules every 2 months :/...
Quoted from mjr:All of those seem nigh impossible to buy, so you might have to MacGuyver something out of sheet metal or 3D printing. I have a couple of machines from the same era that have the same parts, so I can post some pictures of those if it would be helpful.
if the parts are hard to find, i wouldn't mind sending stls to send cut send, or shapeways if needed.
Quoted from Shredder565:if the parts are hard to find, i wouldn't mind sending stls to send cut send, or shapeways if needed.
Paul at virtuapin might have them
Quoted from Shredder565:if the parts are hard to find, i wouldn't mind sending stls to send cut send, or shapeways if needed.
Send-cut-send would be a great solution if you can't find them in stock anywhere. They're all flat sheet-metal parts with one 90-degree bend each, so they'd be simple to bend into shape after laser cutting.
So, I was thinking of what to tackle next. I think the hardest/most annoying part would be inserting the playfield in.
since most people seem to leave the light board insert and and cpu insert last.
At least If I can get this done on the first try, it's one less hard thing to do.
what part numbers do I need for the job? haven't looked at the manual in a month or two heh.
Quoted from Shredder565:So, I was thinking of what to tackle next. I think the hardest/most annoying part would be inserting the playfield in.
since most people seem to leave the light board insert and and cpu insert last.
At least If I can get this done on the first try, it's one less hard thing to do.
what part numbers do I need for the job? haven't looked at the manual in a month or two heh.
The first thing to do is finish the cabinet and get the game running and displayed on the screen.
This includes the light board, all of the circuit boards, the sound system, all of the power connections, all of the cabinet switches, the interconnect board, the plumb bob, and the door switch.
All of this is needed first to troubleshoot and build the playfield.
The playfield is built in layers upon a working cabinet with the playfield mounted on a rotisserie next to the cabinet.
First however all of the playfield mounting brackets are installed to test fit it into the cabinet. This is generally done before anything is installed onto the playfield in case adjustments are needed. Sometimes the playfield rubs the sides or isnt level and needs adjustment.
The wires are plenty long enough to plug into the cpu and driver board with the playfield to the side of the cabinet.
You use the CPU in test mode to check all of the GI wiring and switches, then the mechs.
You have to be able to flip a ball on the playfield before you install the playfield in the game.
The ramps go in after the playfield is installed into the cabinet.
I was hoping for something a little cheaper to work on next ![]() ...and cabinet rotators would have seemed like a first up heh.
...and cabinet rotators would have seemed like a first up heh.
I guessI could look for more of the electronics/plugs side of things and hope they are under $200.
Quoted from Shredder565:So, I was thinking of what to tackle next. I think the hardest/most annoying part would be inserting the playfield in.
what part numbers do I need for the job?
01-8726-L-1 Playfield holder bracket left
01-8726-R-1 Playfield holder bracket right
02-4329 Pivot nut, 1/2", qty 2
4322-01123-20B Carriage bolt, 3/8-16 x 1-1/4", black, qty 2
(TAFG lists a slightly different version of the carriage bolt, 4322-01176-20B, but Marco doesn't carry that one.)
The 01-8726 brackets attach to the underside of the playfield - look for pair of pre-drilled T-nut holes at about 12" from the back on either side. Use suitable machine screws with the T-nuts, and use wood screws in the other four holes in each bracket. (These brackets carry the entire weight of the playfield when it's tilted up, so they need to be solidly attached.) For the pivot nuts, this looks like a fine reference for the drilling locations:
Oh, and you'll also need the hanger brackets, 01-8419, quantity 2, which attach at the front end of hook onto the lockdown bar receiver. That's what holds the playfield up at the front end when it's in normal playing position.
ordered and ready.
I think it might be easier to find a piece of wood the exact size and dimensions of the playfield so I don't have to take things off to make it easier to install properly. then I'll just put the real thing in.
Bracket - playfield hold down 01-8419 2 $8.50 $17.00
Bolt 3/8-16 x 1-1/4" carriage bolt black 4322-01123-20B 2 $0.69 $1.38
Pivot Nut 1/2 inch 02-4329 2 $2.79 $5.58
Bracket - playfield holder 01-8726-R-1 1 $6.00 $6.00
Bracket - playfield holder 01-8726-L-1 1 $6.99 $6.99
Shipping Information
FEDEX Express Saver (3 bus. days by 5 PM)
Subtotal:$36.95Shipping:$19.48Sales Tax:$0.00Total:$56.43
Wanna join the discussion? Please sign in to reply to this topic.

Great to see you're enjoying Pinside! Did you know Pinside is able to run without any 3rd-party banners or ads, thanks to the support from our visitors? Please consider a donation to Pinside and get anext to your username to show for it! Or better yet, subscribe to Pinside+!

This page was printed from https://pinside.com/pinball/forum/topic/addams-family-scratch-build/page/30?hl=sk8ersublime and we tried optimising it for printing. Some page elements may have been deliberately hidden.
Scan the QR code on the left to jump to the URL this document was printed from.
 Hanover, NJ
 Wiener Neustadt
 Edmonton, AB
 Budapest