(Topic ID: 86282)

Addams Family Limo Mod - Building my own

By BrianZ

10 years ago


Topic Heartbeat

Topic Stats

  • 56 posts
  • 22 Pinsiders participating
  • Latest reply 8 years ago by BrianZ
  • Topic is favorited by 31 Pinsiders

You

Topic Gallery

View topic image gallery

image_1.jpg
image.jpg
image_1.jpg
image.jpg
image.jpg
image-154.jpg
IMG_0325.jpg
IMG_0324.jpg
IMG_0318.JPG
IMG_0322.JPG
IMG_0326.jpg
IMG_0323.jpg
IMG_0118.jpg
IMG_0120.jpg
IMG_0117.jpg
Unknown.jpeg

You're currently viewing posts by Pinsider brianz.
Click here to go back to viewing the entire thread.

13
#1 10 years ago

We have all seen the price of the Lighted Limo Mod for Addams Family (at around $200.00). My buddy wanted one for his machine, but did not want his wallet lightened quite that much.

I found the car on ebay, with the seller stating it was the car they used for the mod ($40 including shipping). The seller included LEDs, and a 1 page diagram showing some wiring and thats about it (clearly states no tech support, and provides no further details).

I've only just begun, but i'm starting to see why this mod commands the $$$. It's a fair amount of work to get this built out. I have not seen a post on how to build this mod before, so i thought it might be worthwhile. 1st time trying this, so we will see how it goes...

First the disassembly:

The car needs to be pulled apart to perform all the wiring for LEDs, along with repainting the car the proper color (black)

- Remove the 4 Rivets on the car. 1 in the middle, 1 on the front bumper, and 2 on the back bumper.
- I started with 1/16 bit to start a hole, and then later going to a bit that was equal to the circumference.

IMG_0034.JPGIMG_0034.JPG
IMG_0035.JPGIMG_0035.JPG
IMG_0040.jpgIMG_0040.jpg
IMG_0039.jpgIMG_0039.jpg
IMG_0041.jpgIMG_0041.jpg

#4 10 years ago

Next up are getting the wheels and front grill off.

Figured a few things out on this one.

- Heat up the axles a bit with a lighter/torch. This will soften the glue. Then use a screw driver and gently pry between the tire rim and the body.

- The grill is actually glued to the body. So it takes a while gently moving it around before it will break loose

IMG_0050.jpgIMG_0050.jpg IMG_0052.jpgIMG_0052.jpg
#6 10 years ago

Now that it's apart, time to work on the headlights.

-The diagram the ebay seller sent with the car.
- Checking out the components on a breadboard. I think i will be adding a few additional LEDs...
- I left the headlights connected to the grill, and from the front side of the headlight; used by auger bit on my dremel to make holes for the headlights. Once completed, I cut them from the grill, and made a hole in the back of the headlight for the LED to stick through.

This is far as i will go today. Will have another update in a few days.

IMG_0053.jpgIMG_0053.jpg IMG_0054.jpgIMG_0054.jpg IMG_0055.jpgIMG_0055.jpg IMG_0056.jpgIMG_0056.jpg IMG_0057.jpgIMG_0057.jpg
#7 10 years ago

Off with the paint....

IMG_0059.jpgIMG_0059.jpg IMG_0060.jpgIMG_0060.jpg IMG_0061.jpgIMG_0061.jpg IMG_0062.JPGIMG_0062.JPG
#10 10 years ago

The seller is no longer has an add on ebay. Will see what i can find and post. I

BTW. The model only says Matchbox 1978. Did some research, its a replica of a 1936 Dussenberg TownCar

#12 10 years ago

That's it..

#15 10 years ago
Quoted from dothedoo:

I like the grenade in the first pic. Is that in case the project is a failure?

More like for pinball in general. There are days. My son had to have it from an army surplus store, and now it sits
Figures, someone from Lincoln would see it.

BTW. I grew up in Omaha. Go Big Red!

#19 10 years ago

A little more work. Pictures explain more than words.....

Drilling holes in the side of the cowl for the wires. Start with the smallest bit you can find to drill the initial hole. Then go back with a larger bit that makes room for the wires (covered with shrink tubbing).

Gluing the headlights is a major PIA. From the backside of the headlight poke the led through. You then will be gluing the side of the LED to the grill arms. You will have to cut away part of the grill arms to make this work.

IMG_0063.jpgIMG_0063.jpg
IMG_0065.jpgIMG_0065.jpg
IMG_0066.jpgIMG_0066.jpg
IMG_0068.jpgIMG_0068.jpg
IMG_0070.jpgIMG_0070.jpg

#21 10 years ago
Quoted from TunaSled:

Following this thread for a cool mod project, and because you have a Cyclone cat target decal on your vise.

I currently only have 2 other pinball machines (cyclone, and de sw). Completely rebuilt the cyclone, including the cat stickers....

1 week later
#23 10 years ago

A little behind, due to work. I've done a bit of painting this weekend. After getting it painted, I should have quite a few updates and pictures to post.

It should be noted that I'm figuring this out as I go. I don't have an example that I can reverse engineer, so it takes a bit longer....

Work keeps interfering with pinball.....

#25 10 years ago

So a little more progress. Still painting, been a bit rainy here.

Got a few coats on the inside of the cabin. Plus a coat on the outside (not shown).

My painting rig (not impressive).

Im also going to light up the cabin of the car. I could buy some LED's but i had a spare coin taker 555. Have it apart, and will use it in the cab.

IMG_0093.jpgIMG_0093.jpg IMG_0102.jpgIMG_0102.jpg IMG_0101.jpgIMG_0101.jpg
#27 10 years ago
Quoted from dothedoo:

LOL! Well, if you ever come up for a game let me know and we'll have a pinball tailgate.

Now were talking. Last game i went to i was a kid maybe 13-14 sitting in the 90th row in the end zone. Froze my arse off. Of course, back then they (NE) were top dogs in the Big 8 (when the I formation ruled, and none of this Run-n-Shoot offense)

#28 10 years ago

I did a bit of painting the last few days. Nothing exciting to post yet. If the paint looks good, I should start wiring later this week. Should have some updates with pics soon.

#30 10 years ago

Just good old Rustoleum Standard Black Gloss. I'm getting a little texture to it. Usually i don't have this problem, and can get it smooth as glass. I even sanded between coats..

The picture make it look bad, but to the naked eye it looks fine. Once in the machine it won't matter.

I'm learning on this one...Next one, I'm sure i can improve upon...

IMG_0109.JPGIMG_0109.JPG

#32 10 years ago

So we need to wire this thing.

For the head lights we are using 3mm LEDS (cool white). Depending on where you buy, the will have a forward voltage between 2-3.3V and between 20-30mA.

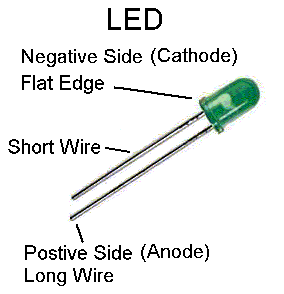
A few things about LEDs we need to know. There DC only, and they don't work when hooked up backwards. Also, if you over power them, they will get hot and burn up.
Hopefully you bought LEDs near the specs i listed above. You need to identify the positive and negative legs of the LED. The longer leg of the LED is Anode or the + of the LED. 20130716084657399.gif20130716084657399.gif

Ok, so we plan on tapping into an insert light under the play filed (more on that later). The pinball machine uses about 6.3V to power the insert bulb. If we hook our LEDS direct, they will burn up. We will need a resistor wired into our LEDs. I won't attempt to cover Ohm's law here, but if you bought to the spec i listed above, a 220 Ohm Resistor should work just fine. We will be wiring the LEDs in series. Note the resistor will wire into the + leg on the first LED. Note that the second Led's Anode (+) connects to the first Cathode (- short post). When u hook this up + will connect to the resistor, with - being your 2 led's Cathode leg. See the pics.
Unknown.jpegUnknown.jpeg

I strongly suggest you buy a 4 AA battery holder, so you can check your wiring before putting into the pinball machine.

The next post i will cover the actual wiring in the car.

#33 10 years ago

So in earlier pictures, I shows the leds legs sticking out from the back of the Headlight. These legs i will route through the holes in the body cowl back into the car. We need to ensure that these legs don't short against each other or the body. I bought 2 sizes of shrink tubbing. I wrapped one leg with the smallest size, and then wrapped both legs with the larger. Getting the LED legs with the shrink tubing (once heated and shrunk) into the holes in the engine cowl is a PIA. Be patient.

The next pic, shows the legs in the car and connected (in series) with the resistor in place. IMG_0117.jpgIMG_0117.jpg

#35 10 years ago

I also wanted to light the interior of the car yellow. I did not have any loose LEDs of that color, so i decide to rip apart a coin taker LED (555) and use it. YOU DONT HAVE TO DO THIS.. I wired it in directly to my circuit.

IMG_0120.jpgIMG_0120.jpg

I'm now doing some bench testing to ensure everything works (temporarily connected to my batteries).
IMG_0118.jpgIMG_0118.jpg

More to come shortly....

#36 10 years ago
Quoted from retired_user_101:

can mail you mine if you want to trade + $

Can u find a nice Addams family play field for a good price? I need to find one.

#38 10 years ago
Quoted from BLACK_ROSE:

Brian , If u don't mind me ask-n ,, " How Many hour's of labor do you have in the TAF car mod ? "

Hmm... So I'm learning as i go, and I don't have a completed car to copy. Also, I'm doing bits and pieces as I have spare time. I'm certain next time, I can get it done quicker.

I guess if you add it all up, about 4 hours so far...

1 week later
#40 10 years ago

Here we go. Finally got some work done. I won't be able to show it installed (or the bracket), since the Addams i was using is in tear down mode.

Here we go...

Drilled a hole in the bottom to run wires. Standard shrink tubbing around the wires.
IMG_0323.jpgIMG_0323.jpg

Once i get the game back together, I will be connecting the wires under the play field to jackpot light.
IMG_0326.jpgIMG_0326.jpg

It will be quite sometime before I show the final install in the machine. But i will post an update once its done.

IMG_0325.jpgIMG_0325.jpgIMG_0324.jpgIMG_0324.jpgIMG_0322.JPGIMG_0322.JPGIMG_0318.JPGIMG_0318.JPG

3 weeks later
#44 9 years ago

Sorry, no pics with it installed right now.

We are in the restore process of the machine; and its totally torn down. I'm now trying to get the playfield either restored or find another one. Probably going to be a few months before i can show it installed.

What's left is the easy part. Install bracket to the car (use a long lamp socket bracket). Bracket would attach to the plastic that is to the right of the jackpot light (plastic has a post holding it up with a nut attaching it). Run wires under the playfield and attach to the bonus insert light.

If anyone can help me source a reasonably priced Addams playfield I would be forever grateful...

7 months later
#46 9 years ago

Jrwill you are correct. At least the car looks generally correct. Would like to see your end product.

5 months later
#49 8 years ago

Finally can show the car being mounted.

From what i can tell, most cars have a metal bracket attached to the car. I went a different route. I bought some clear Lexan at Lowes. I cut a piece and mounted it to the car. I cut a hole for it to slip over the post adjacent to the ramp (1st nut/post front left of ramp). It works well here, and mounts the car well in view; with plenty of clearance.

Be carefull with the Lexan, its fairly durable/rigid; but over tightening can crack it.

Pictures attached show the story...

image_1.jpgimage_1.jpg
image.jpgimage.jpg

#50 8 years ago

Where to run the wires? Lots of options.

- You could run the wire down the back of the white target.
- Or in my case, I ran the wire under the plastic (right of the car), under the metal ramp, and under the clear ramp where there is a large hole for running wires. I connected the wires to the "Bonus Insert" which is the arrow directly in front of the car. I will post a picture later that shows this connection.

3 weeks later
#51 8 years ago

I got a question about powering the car...

Several ways, depending on your interests. You could connect to a local GI bulb. I prefer hard wiring (soldering); but you could cheat and use alligator clippers to make the connection (many pinball mods use these, I don't like them since they eventually vibrate off. If you have bad luck, they can vibrate around and cause a short).
This would keep the lights on throughout the game.

I have mine wired to the the Jackpot insert light. This light is on a green light board, and makes connection a bit more difficult.
A few ways to do this....
1) Use automotive quick splice connectors and connect to the wires connecting to the green board (you will need to trace which wires are lighting that insert). By far the simplest, and easily reversible.
2) Could drill holes in the plastic 555 bulk connector (black plastic). Connect the wires inside the bulb holder....
3) Solder the wires to the solder pad where the 555 bulb holder makes contact. It's not pretty but will work.

Hope this helps....

#53 8 years ago

I'm already thinking about the next one. The bear rug...

Again, i have nothing to compare or copy (except what i see online).

But it looks like the bear is actually from a plastic toy. Playmobil bear rug (brown). It looks like it went to a castle set.
Ebay seems to have them. Paint the bear white. In a few weeks, will look to build one with LED's

1 week later
#56 8 years ago

Awesome.. Thanks. When i get some free time, the bear rug is next.

Promoted items from Pinside Marketplace and Pinside Shops!
$ 1,159.00
$ 15.00
Pinball Machine
Uberlaser
 
$ 109.99
Lighting - Led
Lighted Pinball Mods
 
$ 29.99
Electronics
NO GOUGE PINBALL™
 
26,000 (OBO)
Machine - For Sale
Auckland, NZ
From: $ 1.00
Playfield - Other
Rocket City Pinball
 
$ 140.00
Playfield - Toys/Add-ons
pinballmod
 
$ 30.00
Playfield - Other
YouBentMyWookie
 
$ 180.00
$ 41.99
Lighting - Interactive
Lee's Parts
 
From: $ 134.99
Lighting - Led
Comet Pinball
 
From: $ 11.00
Playfield - Toys/Add-ons
Twisted Tokens
 
$ 1,059.00
$ 65.00
Cabinet - Armor And Blades
arcade-cabinets.com
 
$ 159.00
10,000 (OBO)
Machine - For Sale
Roselle, IL
From: $ 33.00
Gameroom - Decorations
Rocket City Pinball
 
$ 24.00
Various Novelties
Pinball Photos LLC
 
$ 45.00
Playfield - Toys/Add-ons
Twisted Tokens
 
$ 67.99
Lighting - Led
Lee's Parts
 
8,500
Machine - For Sale
Vancouver, BC
20,000 (OBO)
Machine - For Sale
Oakdale, CA
$ 35.00
Cabinet - Other
Rocket City Pinball
 
$ 31.99
Lighting - Interactive
Lee's Parts
 
$ 84.99
Playfield - Toys/Add-ons
GMods
 
$ 29.00
Cabinet - Other
Filament Printing
 
$ 25.99
Lighting - Led
Lee's Parts
 
Hey modders!
Your shop name here

You're currently viewing posts by Pinsider brianz.
Click here to go back to viewing the entire thread.

Reply

Wanna join the discussion? Please sign in to reply to this topic.

Hey there! Welcome to Pinside!

Donate to Pinside

Great to see you're enjoying Pinside! Did you know Pinside is able to run without any 3rd-party banners or ads, thanks to the support from our visitors? Please consider a donation to Pinside and get anext to your username to show for it! Or better yet, subscribe to Pinside+!


This page was printed from https://pinside.com/pinball/forum/topic/addams-family-limo-mod-building-my-own?tu=brianz and we tried optimising it for printing. Some page elements may have been deliberately hidden.

Scan the QR code on the left to jump to the URL this document was printed from.