(Topic ID: 178539)

$100 sttng fix me challenge - experienced techs only

By Djshakes

7 years ago


Topic Heartbeat

Topic Stats

  • 153 posts
  • 34 Pinsiders participating
  • Latest reply 7 years ago by Homepin
  • Topic is favorited by 27 Pinsiders

You

Linked Games

Topic Gallery

View topic image gallery

0206172123 (resized).jpg
0131172019a (resized).jpg
0131172019 (resized).jpg
0131171951b (resized).jpg
0130172139 (resized).jpg
0128171959_HDR (resized).jpg
1485662914628293284915 (resized).jpg
STTNG Switch Matrix-no balls (resized).jpg
Subway (resized).jpg
0128170009 (resized).jpg
0127170651 (resized).jpg
0127170632 (resized).jpg
0127170648 (resized).jpg
DMD Power (resized).jpg
0124172012 (resized).jpg
Left Cannon (resized).jpg

Topic index (key posts)

2 key posts have been marked in this topic

Display key post list sorted by: Post date | Keypost summary | User name

Post #61 Very useful tech iinformation Posted by Pin_Guy (7 years ago)

Post #126 VUK opto test suggestions. Posted by Pin_Guy (7 years ago)


Topic indices are generated from key posts and maintained by Pinside Editors. For more information, or to become an editor yourself read this post!

There are 153 posts in this topic. You are on page 1 of 4.
#1 7 years ago

I'm willing to pay whoever helps me fix this $100 via PayPal gift. The first person to say "I'll take a stab at it" will be my mentor so to speak. They will see me through the whole process of fixing the machine. If we hit a wall the next batter up so to speak will step in. The person that get me to home plate will get the $100.

History:
I bought this machine with 3 other pinball machines. The Playfield and cabinet are in mint condition. For the price I paid it was worth the risk. The owner told me the Cannons were rebuilt but his tech never finished assembling the game. All of the wires in the back box working disconnected. Also the wires on the coin door interface board were disconnected. The game is also missing the right flipper opto board.

I'm very mechanically inclined and recently fixed my friends sttng. I have been able to fix every game I've owned but this may be more than I bargained for.

What I did:
1. Plugged in all the wires in the back box including the coin door interface board.
2. Resoldered left slingshot coil.
3. One of the pop bumper brackets was broken causing the coil to come off. I had to resolder that coil. Zip tied in place till I get a new bracket.
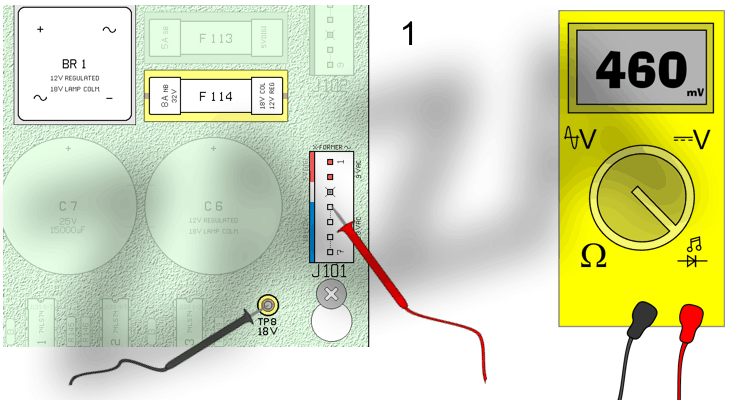
4. Replaced fuse f114 but it blows every time I turn on the game.

Issues :
1. Lots of error messages when I turn on the game. see video
2. None of the insert lights work.
3. Coin door buttons don't operate. Can't scroll through the menu.
4. Right flipper opto board gone.

So, who's the batter up? I'll follow your lead and supply you with what you need. We start tomorrow.

0114172230 (resized).jpg0114172230 (resized).jpg
0114172218 (resized).jpg0114172218 (resized).jpg

17
#2 7 years ago

If F114 blows, the lampmatrix and switches are not working.
Start with a check on bridge BR.1 , disconnect J101 and measure:

409062b.gif409062b.gif

#3 7 years ago

You jumped ahead.
Start simple, work forward.
Nothing has been isolated.

Check all connectors for correct insertion. It is very easy to offset by a single row, and the whole game is thrown into chaos, particularly the MPU board and 0.100 connectors for lights and switches. This includes ribbon cables. You may also have a connector issue for +5 VDC power coming off the PDB.

What has been measured at vdc test points?

If you really want to become a protege there are a number of local collectors in your region that may be willing to teach. Money is not always an objective.

#4 7 years ago

I think zaza is going all in.

From KLOV:
"Addams dead switches + blows fuse F114
removed all connectors (except J101..) and F114 blows the instant I switch on.
....also, none of the switches on the coin door and start button are working. "

Then at end of thread:
"BR1 is indeed the culprit! thanks a bunch!! "

#5 7 years ago

Thanks all. I'll report back tonight.

#6 7 years ago

I'm'a sit here and wait for a bunch of people to fail just for there to be one more issue, step in, and take the 100 bucks.

#7 7 years ago

As usual Zaza is giving sound advice. Since you are blowing the 18V fuse, you are not only missing the 18V for the lamps (LED6), you are also missing your regulated 12V DC (LED 1) to the MPU since it is developed from the 18V DC; because of this it's pointless to do any work on the lamp or switch matrix. Additionally, the missing 12VR is needed by the MPU for your dedicated ground switches on the coin door, and would be why they are not working.

Edit: Circuit added so you can see where this information comes from.

18V (resized).png18V (resized).png

#8 7 years ago

Ok, I'll say it "I'll take a stab at it" ... I'm confident that you will get it fully operational. If you have to have order a a new BR1, take advantage of this time to evaluate the condition of your cannons and your three diverters; 2 are in the subway and one for the Delta ramp. All 5 of these parts were greased when the game was first assembled and this grease is likely hardened, you will want to remove all of the old grease from these parts and apply a thin coat of grease to them, I use Super Lube on mine. https://www.amazon.com/Super-Lube-21030-Synthetic-Grease/dp/B000XBH9HI

#9 7 years ago
Quoted from Pin_Guy:

Ok, I'll say it "I'll take a stab at it" ... I'm confident that you will get it fully operational. If you have to have order a a new BR1, take advantage of this time to evaluate the condition of your cannons and your three diverters; 2 are in the subway and one for the Delta ramp. All 5 of these parts were greased when the game was first assembled and this grease is likely hardened, you will want to remove all of the old grease from these parts and apply a thin coat of grease to them, I use Super Lube on mine. amazon.com link »

Alright pinguy, let's do this. I performed the test Zaza mentioned. I first replaced the 8a 32v fuse with an 8a 250v. I don't have a 32v, will this be an issue? I got the following readings below when following his test above with machine off.
1= .470 v
2=.470 v
3=. 00 no reading
4=. 00 no reading I even tried the grounding braid instead of screw.

Also, I have extra bridges from when I helped ibjames with his. After tracking down a diode on his drop target switch the game plays flawlessly (after all the boardwalk also).

#10 7 years ago

Now this is an entertaining and useful thread! Popcorn is popping as we speak...

#11 7 years ago
Quoted from Djshakes:

I don't have a 32v, will this be an issue?

This is NOT an issue.

The checks Zaza had you do is to look for shorted bridge rectifier diodes, it seems you are reading 0.00V to ground on two readings, this is what you would also read if you put your meter leads together. I personally prefer to take resistance measurements but either way you check them gets you to the same place, you have confirmed that BR1 has two shorted bridge diodes and needs to be replace.

IMG_1889 (resized).JPGIMG_1889 (resized).JPG
IMG_1891 (resized).JPGIMG_1891 (resized).JPG

Depending on your soldering skills and equipment you can opt to replace it yourself, or have someone else replace it for you. Fair warning...things can go South really fast if the board is damaged when replacing this component, let me know how you handle the board repair. This bridge rectifier is going to be difficult to do since you basically have to remove both BR1 and BR2 at the same time by desoldering all 8 leads in order to remove the heatsink, and you would replace both of them at the same time.

#12 7 years ago
Quoted from Pin_Guy:

This is NOT an issue.
The checks Zaza had you do is to look for shorted bridge rectifier diodes, it seems you are reading 0.00V to ground on two readings, this is what you would also read if you put your meter leads together. I personally prefer to take resistance measurements but either way you check them gets you to the same place, you have confirmed that BR1 has two shorted bridge diodes and needs to be replace.

Depending on your soldering skills and equipment you can opt to replace it yourself, or have someone else replace it for you. Fair warning...things can go South really fast if the board is damaged when replacing this component, let me know how you handle the board repair. This bridge rectifier is going to be difficult to do since you basically have to remove both BR1 and BR2 at the same time by desoldering all 8 leads in order to remove the heatsink, and you would replace both of them at the same time.

This won't be a problem for me. I'll get on it and report back. Do you think this would cause those close ground error messages? The game is just full on spazing out.

#13 7 years ago

You could just remove the board and send it to Rob Anthony and get it professional looked at for $100.

Quoted from Djshakes:

This won't be a problem for me. I'll get on it and report back. Do you think this would cause those close ground error messages? The game is just full on spazing out.

#14 7 years ago
Quoted from Djshakes:

This won't be a problem for me. I'll get on it and report back. Do you think this would cause those close ground error messages? The game is just full on spazing out.

I believe that is the case, without having a working 12V to the processor, it is likely reading a low on all switches and has no idea where any any of the balls are.

I the more I thought about your OEM power board, the more I felt I needed to add more information on this...it's very unlikely that BR1 and BR2 can be successfully replaced without a desoldering station, attempting to replace these with a hand operated extractor will likely result in board damage. You have several options available to you, there is likely going to be repair facilities in your area where you can get this board repaired, there are also several reputable people on this site that do fantastic work.

#15 7 years ago

I'm not experienced. But I'd unplug the row one connector from the cpu. If error stays you have board damage on the cpu. If the error goes away you have a short to row one out in the game. White wire with brown stripe. A short to wiring, switch lugs, switch shorted internally type stuff.

Quoted from Djshakes:

Do you think this would cause those close ground error messages?

No, because all the rows would be showing up in error.

LTG : )

#16 7 years ago

Let me see what happens when I pull that fuse from my machine...

#17 7 years ago

You do realize that you are trying to fix a problem "over the Internet" that is not best solved hiring an over the Internet tech. Right? If so, carry on but at least make yourself a "breaker relay fuse" so you don't needlessly burn up a dozen fuses trying to solve the problem.

#18 7 years ago
Quoted from zaza:

If F114 blows, the lampmatrix and switches are not working.
Start with a check on bridge BR.1 , disconnect J101 and measure:

Man that is one awesome animated gif image, it's so nice to see where exactly needs probed. Someone should make a quick tutorial post on how to make those types of images for other people to create in other tech threads.

#19 7 years ago
Quoted from Pin_Guy:

I believe that is the case, without having a working 12V to the processor, it is likely reading a low on all switches and has no idea where any any of the balls are.
I the more I thought about your OEM power board, the more I felt I needed to add more information on this...it's very unlikely that BR1 and BR2 can be successfully replaced without a desoldering station, attempting to replace these with a hand operated extractor will likely result in board damage. You have several options available to you, there is likely going to be repair facilities in your area where you can get this board repaired, there are also several reputable people on this site that do fantastic work.

I successfully change the bridges and caps on my buddies sttng. I should be okay. I'm half tempted to shotgun this thing and do the caps as well. Interesting how the guys tech had all the connectors disconnected to "rebuild the cannons". I wonder if this is what he planned on doing.

#20 7 years ago
Quoted from LTG:

I'm not experienced. But I'd unplug the row one connector from the cpu. If error stays you have board damage on the cpu. If the error goes away you have a short to row one out in the game. White wire with brown stripe. A short to wiring, switch lugs, switch shorted internally type stuff.

No, because all the rows would be showing up in error.
LTG : )

I resoldered the slingshot coil, I mirrored the one on the other side. Does it matter if those are flipped?

#21 7 years ago
Quoted from Djshakes:

I successfully change the bridges and caps on my buddies sttng. I should be okay.

Awesome! You should do fine then.

Quoted from Djshakes:

I resoldered the slingshot coil, I mirrored the one on the other side. Does it matter if those are flipped?

I don't believe any of these coils (other than flippers) have diodes on them so it should not matter.

#22 7 years ago
Quoted from Pin_Guy:

Awesome! You should do fine then.

I don't believe any of these coils (other than flippers) have diodes on them so it should not matter.

I just edited my previous post.

#23 7 years ago
Quoted from sevenrites:

Man that is one awesome animated gif image, it's so nice to see where exactly needs probed. Someone should make a quick tutorial post on how to make those types of images for other people to create in other tech threads.

http://gifmaker.me/

#24 7 years ago

Ok so on your game spazing out ... This is hard to define, without knowing exactly what the machine is doing, like I mentioned before, it will be looking for balls since you essentially have no switch matrix; it will go through a ball locate program and fire coils turn on the cannons ... etc.

Quoted from LTG:

No, because all the rows would be showing up in error.

Very true, the software should be smart enough to realize that all the rows are bad and give you the "check F114 and F115 message"

As a rule of thumb, the first priority in any troubleshooting is to get your power supply voltages taken care of first, and then look into any other alarms. Since you know your BR1 is bad, let's get it squared away before delving in too deep on any other issues.

#25 7 years ago

Looks like some work done previously. Br2 appears to be replaced. Some other shordy work on j120.

0115171311a (resized).jpg0115171311a (resized).jpg

0115171309 (resized).jpg0115171309 (resized).jpg

0115171308a (resized).jpg0115171308a (resized).jpg

#26 7 years ago

I hate seeing stuff like that, It's hard to tell with all the flux residue but it doesn't look like they pulled off any of the pads. They should have did BR1 at the same time, if they did you probably wouldn't be where you are now

#27 7 years ago

I'll replace both even though one is new.

#28 7 years ago
Quoted from Djshakes:

I'm half tempted to shotgun this thing and do the caps as well.

I don't recommend that as you could end up inducing new problems into the mix. If you really want to do that I would suggest waiting until the machine is fully working, that way should there be a new problem introduced, you can limit it to what was just touched instead of not knowing if it existed before you messed with it.

#29 7 years ago
Quoted from Djshakes:

I'll replace both even though one is new.

Good call, the concern here is you have no idea how hot the heat sink got before BR1 failed and this heat could have degraded BR2 since they share the same heatsink.

#30 7 years ago

While you are away replacing your BR's I did a little testing for you (this is one of my favorite things to do) I simulated a blown F114 as well as row 1 ground short. While F114 was removed, I was not able to see the ground short on row 1, as soon as the processor 12VR was restored by replacing F114 the ground short showed up.
IMG_1892 (resized).JPGIMG_1892 (resized).JPG
This ground short will prevent any further diagnostics but also makes me curious as to why you are not seeing the blown F114 F115 fuse message; after restoring your 12VR, please post a good picture of the bottom half of your MPU board, so I can see the board and connectors, then I'd like you to remove the row and column connectors to the playfield and turn the machine on, with no information coming back to the processor, it should tell you to check fuse F114 and F115 since it will not be receiving any information back from the switches, you may want to keep the coin door open so you dont have to listen to the continuous firing of coils.

#31 7 years ago
Quoted from Pin_Guy:

Very true, the software should be smart enough to realize that all the rows are bad and give you the "check F114 and F115 message"

Note that the ROM (OS part of the ROM image, specifically) will ALSO give this message if it does not see the 'Always Closed' switch closed.

Not having your coin door interface board connected will cause this, since the 'Always Closed' switch (24, I believe?) is on the CDI.

#32 7 years ago

ohhhh....I just watched the video. I now know what you man by freaking out, the missing 12VR will not cause the problems from your video.

#33 7 years ago
Quoted from Coyote:

Note that the ROM (OS part of the ROM image, specifically) will ALSO give this message if it does not see the 'Always Closed' switch closed.
Not having your coin door interface board connected will cause this, since the 'Always Closed' switch (24, I believe?) is on the CDI.

The thing I'm not seeing here is as far as I can tell there is no message to check F114 and F115 even with a blown F114 ... maybe I'm just assuming that this message didn't show up and reading too much into whats not there...

#34 7 years ago

Sorry, I am pumped about Packers win. I unplugged the board and removed earlier today to replace the brs. I did remember seeing the 114 and 115 error at one point prior to the ground errors. I Initially didn't have the ground error issues. I plugged in a connector that wasnt on right and then ended to with that message. I know they were all plugged in right after.

#35 7 years ago

send board to rob Anthony and be done with the headaches. fixed, working, in a week or 2!

#36 7 years ago
Quoted from ccbiggsoo7:

send board to rob Anthony and be done with the headaches. fixed, working, in a week or 2!

Tempting but I don't mind doing the work and it's an opportunity to learn.

#37 7 years ago

If the caps have a slight bulge on top, very slight, should I replace while board is out.

#38 7 years ago
Quoted from Djshakes:

Tempting but I don't mind doing the work and it's an opportunity to learn.

I always prefer to do any work myself if possible, it's a big part of what makes pinball ownership fun for me!

#39 7 years ago
Quoted from Djshakes:

If the caps have a slight bulge on top, very slight, should I replace while board is out.

If you are concerned with it, then go for it, since you have done this to your friends without any problems I have to assume you are technically competent to do so.

After you get this put back in, can you post pictures of the connections for your MPU, aux driver, and fliptronics boards?

#40 7 years ago
Quoted from Pin_Guy:

If you are concerned with it, then go for it, since you have done this to your friends without any problems I have to assume you are technically competent to do so.
After you get this put back in, can you post pictures of the connections for your MPU, aux driver, and fliptronics boards?

Will do, probably be in a day or two. Hoping to get over to my buddies tonight but may have to take a couple days off. Pinball consumed my life the last couple weeks and I sense the wife getting pissed.

#41 7 years ago
Quoted from Djshakes:

Hoping to get over to my buddies tonight

Any chance you can toss your MPU in his machine to verify its operating properly?

#42 7 years ago
Quoted from Pin_Guy:

Any chance you can toss your MPU in his machine to verify its operating properly?

Yeah, I'll try. Like I said, give me a day or two.

#43 7 years ago
Quoted from jalpert:

You could just remove the board and send it to Rob Anthony and get it professional looked at for $100.

ditto, or buy a new board...game is fixed instantly and bulletproof for future....

#44 7 years ago
Quoted from Wickerman2:

ditto, or buy a new board...game is fixed instantly and bulletproof for future....

I think what the OP is saying is that its not just wanting to get it to work, but rather the personal satisfaction of doing the repair himself...I get the same feeling when I fix something rather than replace...

#45 7 years ago

You've got a bunch of bad solder joints on that board. The two I have circled in red are cracked and it's hard to tell with the flux on the other joints, but they look like cold solder joints (the highest point of that solder should be at the pin not on each side of the pin). I'm sure there are others besides what I've noted.

solder-joints (resized).jpgsolder-joints (resized).jpg

#46 7 years ago
Quoted from terryb:

You've got a bunch of bad solder joints on that board. The two I have circled in red are cracked and it's hard to tell with the flux on the other joints, but they look like cold solder joints (the highest point of that solder should be at the pin not on each side of the pin). I'm sure there are others besides what I've noted.

Thanks, I'll reflow

#47 7 years ago

Quick snapped pics of other boards.

0116171649c (resized).jpg0116171649c (resized).jpg

0116171649b (resized).jpg0116171649b (resized).jpg

0116171649a (resized).jpg0116171649a (resized).jpg

0116171649 (resized).jpg0116171649 (resized).jpg

0116171648 (resized).jpg0116171648 (resized).jpg

#48 7 years ago

Pay Clay $20 for his ninja site. He covers all the issues with videos.

#49 7 years ago

Ditch those alkaline batteries on the board asap. Use an off-board battery holder, memory cap or NVRAM to prevent possible alkaline damage in the future.

#50 7 years ago
Quoted from wayout440:

Ditch those alkaline batteries on the board asap. Use an off-board battery holder, memory cap or NVRAM to prevent possible alkaline damage in the future.

I plan on doing that, just want to get game working first.

Promoted items from Pinside Marketplace and Pinside Shops!
$ 1.00
Pinball Machine
Pinball Alley
 
$ 30.00
Playfield - Other
YouBentMyWookie
 
$ 64.99
$ 9.95
From: $ 25.00
Playfield - Decals
Pinball Invasion
 
$ 599.00
Cabinet - Toppers
Juz PINBALL Mods
 
$ 85.00
Boards
Pinball Haus
 
$ 79.99
Cabinet - Armor And Blades
PinGraffix Pinside Shop
 
$ 35.00
Cabinet - Other
Rocket City Pinball
 
$ 259.99
Cabinet - Toppers
Lighted Pinball Mods
 
$ 10.00
Playfield - Protection
UpKick Pinball
 
$ 20.00
Playfield - Decals
Pinball Haus
 
$ 49.99
Cabinet - Toppers
Lighted Pinball Mods
 
$ 399.00
Cabinet - Decals
Mircoplayfields
 
$ 19.95
Lighting - Led
Mitchell Lighting
 
$ 15.00
$ 15.95
Lighting - Led
Mitchell Lighting
 
7,900
Machine - For Sale
Winston-salem, NC
6,000
Machine - For Sale
West Chester, PA
$ 63.95
$ 29.00
Cabinet - Other
Filament Printing
 
$ 27.99
Lighting - Interactive
Lee's Parts
 
$ 9.99
Eproms
Matt's Basement Arcade
 
$ 22.50
Playfield - Decals
Pinball Haus
 
7,000
Machine - For Sale
San Diego, CA
$ 85.00
$ 250.00
Lighting - Interactive
Professor Pinball
 
Wanted
Machine - Wanted
Pleasanton, CA
Great pinball charity
Pinball Edu
There are 153 posts in this topic. You are on page 1 of 4.

Reply

Wanna join the discussion? Please sign in to reply to this topic.

Hey there! Welcome to Pinside!

Donate to Pinside

Great to see you're enjoying Pinside! Did you know Pinside is able to run without any 3rd-party banners or ads, thanks to the support from our visitors? Please consider a donation to Pinside and get anext to your username to show for it! Or better yet, subscribe to Pinside+!


This page was printed from https://pinside.com/pinball/forum/topic/100-sttng-fix-me-challenge-experienced-techs-only and we tried optimising it for printing. Some page elements may have been deliberately hidden.

Scan the QR code on the left to jump to the URL this document was printed from.