(Topic ID: 21848)

VID's Guide to Lighted Flipper Buttons for $4.18

By vid1900

11 years ago


Topic Heartbeat

Topic Stats

  • 197 posts
  • 83 Pinsiders participating
  • Latest reply 2 years ago by BorgDog
  • Topic is favorited by 258 Pinsiders

You

Linked Games

No games have been linked to this topic.

    Topic Gallery

    View topic image gallery

    20220108_154212 (resized).jpg
    20220108_151936 (resized).jpg
    20220108_151943 (resized).jpg
    20220108_151822 (resized).jpg
    IMG_2069 (resized).JPG
    20170317_193211 (resized).jpg
    20170317_192936 (resized).jpg
    20170221_135020 (resized).jpg
    20170312_201521 (resized).jpg
    02 (resized).jpeg
    01 (resized).jpg
    image.jpg
    20141102_003613.jpg
    IMG_1256.JPG
    image-739.jpg
    image-182.jpg
    There are 197 posts in this topic. You are on page 1 of 4.
    27
    #1 11 years ago

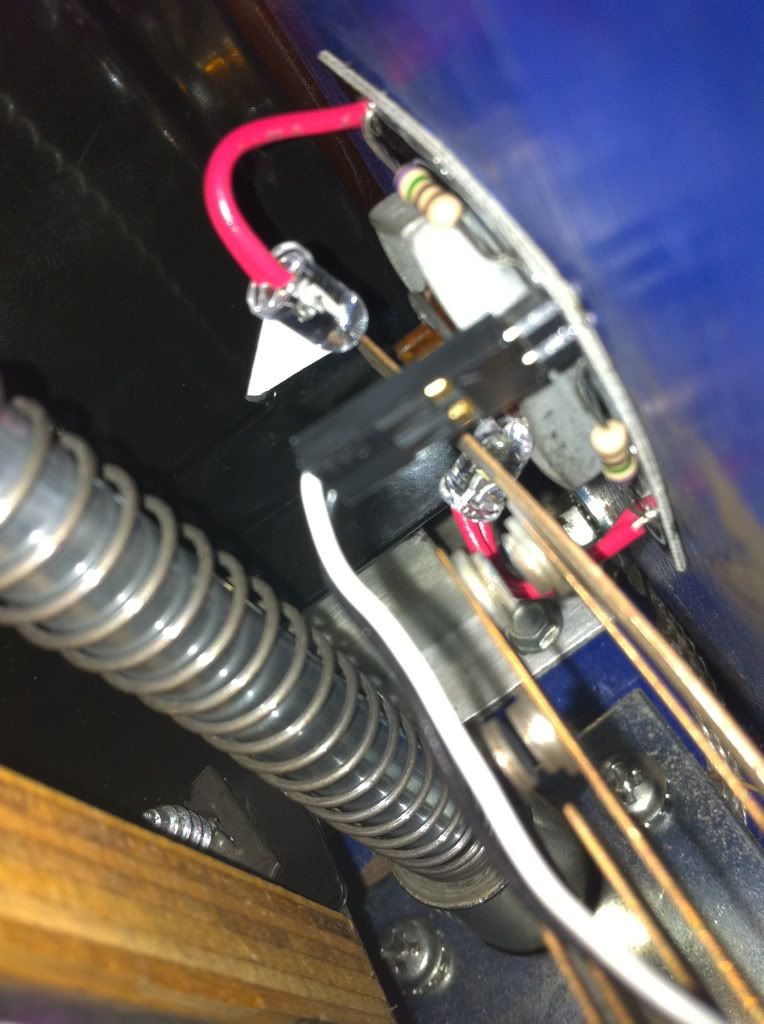
    So I'm plowing through a pile of Space Shuttles that I'm restoring all at once, and one customer wants lighted flipper buttons. He mails me a kit to install that costs $64.

    Then another customer hears about it and he wants me to wait so he can order the same kit.

    I tell him I've got all the parts laying around the shop, and it sure does not cost $64 if you DIY.

    #2 11 years ago

    Everyone has some #44 sockets in their junk pile (.50 cents) .

    I had some FLEX 44/47 PREMIUM BLUE SUPER from Cointaker already in the shop ($1.59).

    SOCKET-AND-LAMP.jpgSOCKET-AND-LAMP.jpg

    #3 11 years ago

    Screw the Socket under the flipper button and out of the way of the Flipper Button Leaf Switch.

    Run the wires from the socket to the GI for the coin door (the 25 cent lights).

    Position the head of the LED so it is shining slightly up.

    Don't let the LED head touch the Leaf Switch, or it may wear out the LED or break the LED's leads.

    INSTALLED-LED.jpgINSTALLED-LED.jpg

    #4 11 years ago

    Great idea, I'll be doing this on f-14 for sure.

    #5 11 years ago

    Finally, here is what it looks like from the outside. It's brighter than the picture shows in real life, but it is hard to take a picture of an LED.

    Total cost was under $5. Total time was 15 minutes to do both sides.

    If you wanted to go completely insane, you could install 2 LEDs per side, but your total cost would go up to $8.36.

    FLIPPER-BUTTON.jpgFLIPPER-BUTTON.jpg

    #6 11 years ago

    I saw the same thing with the lighted scoop mod for 30 bucks, it is nothing but a socket and a led total cost is around $4.50.
    Crazy.

    #7 11 years ago
    Quoted from Wolfmarsh:

    Great idea, I'll be doing this on f-14 for sure.

    Yeah, blue or red would look great on F-14.

    Or a color changing LED that does red white and blue (take it out of one of those stupidly bright 4th of July buttons). You would need a pair of clear flipper buttons for this, so add $3 to the total price for the pair.

    http://www.pinballlife.com/index.php?p=product&id=1692

    #8 11 years ago

    Thanks vid1900, I'll be trying that one also.
    Bob

    #9 11 years ago

    vid >> I love your pictorial "how to do" threads. Onw of my favorite things about pinside!!!

    I owe you a drink if I ever see you at a pinball gathering. cheers

    #10 11 years ago

    I get email from people who don't want to post questions on the forum, LOL.

    Q: Vid1900, is that flipper button blue or clear in the picture? and I cant figure how to get my buttons off.

    A:

    That button pictured is transparent blue.

    Use duck bill pliers and turn the metal nut CCW. If the button is still stuck without the nut, use a wood block and rubber mallet to gently tap it out.

    #11 11 years ago

    Clever! I might stick some blues on my DM buttons.

    #12 11 years ago

    Nice mod, i too want to try this.

    #13 11 years ago
    Quoted from vid1900:

    FLEX 44/47 PREMIUM BLUE SUPER

    so these have a head on it where you can position to where u want, and it will not move? interesting for sure.

    could you also take a picture of where on the coin door you ran the wires to for the GI? thanks

    #14 11 years ago

    Another helpful post by vid! Thanks!

    #15 11 years ago

    great idea! I assume you could also use a 555 socket and bulb? You will also need transparent flipper buttons....

    #16 11 years ago

    Good post VID, thanks!

    #17 11 years ago
    Quoted from mojozone:

    so these have a head on it where you can position to where u want, and it will not move? interesting for sure.

    Yes.

    Normally they are used to get light into difficult spots, like when you have a narrow arrow insert that needs to be lit through the hole in the drop target bracket.

    #18 11 years ago

    This is so obvious and stupid I don't know why I haven't already done it. Crap! +1.

    #19 11 years ago

    I've been thinking of doing this to light the slot machine hole on TZ

    #21 11 years ago

    I've been thinking of doing this to light the slot machine hole on TZ

    The scoop looks good lit up, I used a purple ultra bright from Cointaker for mine.
    I used the same one for the shooter lane and piano as well.

    TZfin_006.jpgTZfin_006.jpg

    #22 11 years ago

    Any way to light a saucer?

    #23 11 years ago

    could you also take a picture of where on the coin door you ran the wires to for the GI? thanks

    Most coin doors have 2 or 3 lights that are GI (General Illumination) and are thus always on.

    Tap power from any bulb. The one closest to the coin door hinge is usually the easiest.

    The power at the bulb is 6.3 Volts AC, so you don't have to worry about polarity - either wire can go to either lamp lug.

    Replace the coin door #44 bulbs with LEDs while you are in there - it will save electricity and restore the deep red the 25 cent sign had before it faded over the years.

    Use small zip ties to secure your new wires to the existing wiring harness.

    coin-door.jpgcoin-door.jpg

    #24 11 years ago
    Quoted from pinwillie:

    great idea! I assume you could also use a 555 socket and bulb?

    Yes.

    It is harder to find suitable 555 sockets, so a stiff wired one made for pop bumpers might be an easy solution (and one you already have in the shop).

    http://www.pinballlife.com/index.php?p=product&id=1245

    Don't staple the leads too close to the socket until you find your perfect spot. You can put shrink tubing or aquarium airline tubing over the leads if they are too close to the grounding straps.

    #25 11 years ago
    Quoted from pinwillie:

    You will also need transparent flipper buttons....

    http://www.pinballlife.com/index.php?p=product&id=1692

    Same price as the opaque ones, $1.50 . Transparent Blue, Red and Clear.

    Transparent Green, Purple and Amber buttons are available too, but they are 1/4" longer (made for video games), so you have to shim the leaf switch out with a standoff if you want those colors.

    #26 11 years ago

    I do this already but use the 555 flex bulbs. Here are the sockets for those:
    http://www.pinballlife.com/index.php?p=product&id=294

    #27 11 years ago

    I do this already but use the 555 flex bulbs. Here are the sockets for those:
    http://www.pinballlife.com/index.php?p=product&id=294

    If you use the 555 sockets use 1/2" shrink tube to hold the leds in so they don't fall out.

    Spotlights_005.jpgSpotlights_005.jpg

    #28 11 years ago

    If you use the 555 sockets use 1/2" shrink tube to hold the leds in so they don't fall out.

    I can't make sense of your picture. But you don't need shrink tube. The bulbs dont fall out. In this case, the bulb is held in by gravity on top of the pressure of the socket, which is sufficient even if the bulb was upside down. Here is a picture from the bottom through the coin door. The top of the bulb is flex so it points to the top of the button.

    IMG_1308.JPGIMG_1308.JPG

    #29 11 years ago
    Quoted from markmon:

    I do this already but use the 555 flex bulbs. Here are the sockets for those:
    http://www.pinballlife.com/index.php?p=product&id=294

    Yes, those would be good sockets.

    Believe it or not, they don't come up in a search on Pinball life for "lamp socket", LOL.

    #30 11 years ago
    Quoted from vid1900:

    Yes, those would be good sockets.
    Believe it or not, they don't come up in a search on Pinball life for "lamp socket", LOL.

    Yea, I use "spotlight" for the search since I use these all the time to add spot lights after doing LED installs. Brightens the entire machine to play in a dark gameroom.

    #32 11 years ago

    Nice little mod Vid.
    The only difference with the store bought ones is that some of them pulse.
    I've only ever bought one (for Tron), but it has a nice slow pulse which animates the buttons.

    #33 11 years ago

    Ok might sound like a dumb question but what about the wire? Any will do?

    #34 11 years ago
    Quoted from Drano:

    Nice little mod Vid.
    The only difference with the store bought ones is that some of them pulse.
    I've only ever bought one (for Tron), but it has a nice slow pulse which animates the buttons.

    On my Tron I tied them to the start button so they flash in attract mode but are solid when the game is played

    #35 11 years ago
    Quoted from Drano:

    The only difference with the store bought ones is that some of them pulse.

    Cointalker sells pulsing bulbs if you want them:

    #36 11 years ago
    Quoted from pinsrus:

    Ok might sound like a dumb question but what about the wire? Any will do?

    Not a dumb question.

    Any wire 24 gage or heavier will be fine. The smaller the gage number, the heavier the wire (don't ask me why).

    Get stranded, not solid wire; as it will be flexing when you open the coin door.

    You can even use speaker wire if that's all you have.

    #37 11 years ago

    Is the pricing on that site for a single button or a pair?

    #38 11 years ago
    Quoted from vid1900:

    Not a dumb question.
    Any wire 24 gage or heavier will be fine. The smaller the gage number, the heavier the wire (don't ask me why).
    Get stranded, not solid wire; as it will be flexing when you open the coin door.
    You can even use speaker wire if that's all you have.

    Thanks vid, speaker wire is actually what I was thinking of using. Ha

    #39 11 years ago
    Quoted from pinsrus:

    Thanks vid, speaker wire is actually what I was thinking of using. Ha

    Nothing wrong with speaker wire.

    If you were doing some $$$$$ restore, you would probably want something more "pinball looking", that would appear to be factory wire.

    #40 11 years ago
    Quoted from vid1900:

    Is the pricing on that site for a single button or a pair?

    I think it is per button but like I said if you put it together it's cheaper... very easy kit to solder together. Looks professional and no need to put screws inside the wood of the cabinet.

    I almost did the same thing you did here but I found those nite mites and I thought they looked a bit more pro looking

    #41 11 years ago

    Awesome thread vid1900! I actually purchased the purple cointaker kit for my TOTAN, but their purple was not very purple. Plus it is much more expensive than your solution. I will have to give this a try

    #42 11 years ago
    Quoted from bluevegas:

    Awesome thread vid1900! I actually purchased the purple cointaker kit for my TOTAN, but their purple was not very purple.

    Yeah, I have some Super Flex Purple from them and they look Pink!

    I'll same em for the next time I restore a Dolly Parton.

    ]
    ]

    Pinball Life's frosted Purples are purple.

    #44 11 years ago
    Quoted from vid1900:

    Pinball Life's frosted Purples are purple.

    would those work even though they are not flex?

    #45 11 years ago
    Quoted from bluevegas:

    would those work even though they are not flex?

    Assuming these are the same quality of purple light, I'd try this bulb:

    http://www.pinballlife.com/index.php?p=product&id=2561

    ]

    And this socket so you can aim the light inwards:

    http://www.marcospecialties.com/pinball-parts/077-5009-00

    #46 11 years ago

    Any way to light a saucer?

    As a matter of fact, Space Shuttle has 2 red (or sometimes gold) Saucers that I always add light to.

    Here I've taken voltage from the nearby GI lamp, installed a #44 socket, and installed a flex LED.

    saucer.jpgsaucer.jpg

    #47 11 years ago

    Like always, make sure the LED clears the switch and pawl.

    #48 11 years ago

    I like this solution, thanks for posting. There are some interesting things you can do with these boards!

    #49 11 years ago

    Great idea.
    Looks like it would work for start buttons also.

    #50 11 years ago

    As a matter of fact, Space Shuttle has 2 red (or sometimes gold) Saucers that I always add light to.
    Here I've taken voltage from the nearby GI lamp, installed a #44 socket, and installed a flex LED.

    CT frosted work good for the eject hole plastics as well

    2012-08-08_12.38.57.jpg2012-08-08_12.38.57.jpg

    There are 197 posts in this topic. You are on page 1 of 4.

    Reply

    Wanna join the discussion? Please sign in to reply to this topic.

    Hey there! Welcome to Pinside!

    Donate to Pinside

    Great to see you're enjoying Pinside! Did you know Pinside is able to run without any 3rd-party banners or ads, thanks to the support from our visitors? Please consider a donation to Pinside and get anext to your username to show for it! Or better yet, subscribe to Pinside+!


    This page was printed from https://pinside.com/pinball/forum/topic/vids-guide-to-lighted-flipper-buttons-for-418 and we tried optimising it for printing. Some page elements may have been deliberately hidden.

    Scan the QR code on the left to jump to the URL this document was printed from.